Last week we traveled to Provence to see the amazing fields of lavender, and this week we are going to put that lavender into stitch form with a free pattern! This little circle of lavender can be stitched onto just about anything—a hand towel, an ornament, or a sachet—which is what I (Kara) am going to show you today.
Lets get started!
The first step was gathering my threads. I love it when I can use my Valdani threads, so I chose one of my favorite greens for the stems and then a solid black and a variegated gold for the little bees. It always seems that though you have lots of threads, you don't have the right one for a particular project. That was the case with my purples, so I made one up by using 2 strands of the lighter purple floss and 1 strand of the darker purple. This created the depth in the purple shades that I wanted.
 |
| Valdani 12 pearl cotton and Weeks DyeWorks floss |
Using the pattern, I traced the circle onto a 4" piece of linen and then drew lines for the lavender. You can just mark the dots for the French knots as they are shown on the pattern. Then I used the green pearl cotton and did a stem stitch around the whole circle and added lazy daisies for the leaves. After that was finished, I added the French knots for the lavender. The bees were made by making a 3-wrap bullion knot using a strand each of gold and yellow threaded together. When you wrap the threads around the needle, wrap them carefully so the two colors alternate, and then pull through. White sewing thread and a lazy daisy stitch make the wings.
 |
| Stem stitch |
 |
| French knots with 1 strand of dark purple, and 2 strands of light purple |
 |
| Tiny bees! |
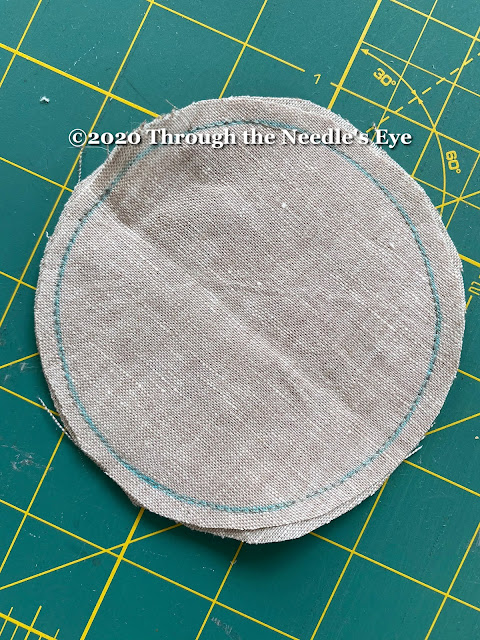
Once the embroidery was finished, I cut a 4" square backing piece to match the front. Then I marked a 3.75" circle on both pieces making sure I centered the lavender circle in the middle. When I cut out my circles, I left a 1/4" seam allowance on both. I put right sides together and used the drawn circle on my backing as a stitching guide, making sure I left an opening to turn.
 |
| 4" squares front and back. |
 |
| A 3.75" circle is drawn and then cut out with a 1/4" seam allowance. |
 |
| Use the drawn circle on the backing as your stitching guide. Leave a space open for turning. |
Once I had turned the sachet, I dampened it to remove the blue marker and then let it dry before I stuffed it with the lavender and poly-stuffing. When it was dry, I gave it a bit of a press as the linen likes to wrinkle. I used a funnel and wooden skewer to put the lavender in the sachet. I only used about 4 tablespoons of lavender and then filled it with poly-stuffing until I was pleased with the shape.
 |
| I bought the lavender on Amazon for under $10 and should have plenty for more sachets. |
I decided I wanted to add a hanger so it could be hung in a closet if needed. I cut a 2" piece of velvet ribbon and inserted the ends in before I stitched the opening closed.
 |
| All stuffed and ready to insert the hanger and stitch it closed. |
 |
| The finished sachet! |
Voila! The sachet is finished! While I made mine as a circle, making a square would work as well. This will make a sweet and functional little gift, and for me it also provides a scented memory of my travels to Provence.
You can download the pattern below. If you stitch this up, please send us pictures of your finished lavender. We would love to see them!

You never cease to amaze me in your designs! I love this lavender sachet design..thank you for sharing!
ReplyDeleteAwww...thanks Laura!
DeleteThanks so much. It's lovely!
ReplyDeleteYou are welcome and we hope you enjoy stitching it!
DeleteWhat a lovely keepsake to make for someone. I think we could all use a little more lavender in our lives these days. Thanks for the stepped out tutorial and the pattern.
ReplyDeleteYou are welcome and that is for sure! Maybe if people walked around with a lavender sachet, they would be calmer! 😁
DeleteWhat a sweet sachet! Thanks for the tutorial. I think you are on to something here. Maybe if we simply spread the world with lavender everyone would be kinder. Thanks for sharing.
ReplyDeleteThanks Wendy!!
DeleteThank you love lavender
ReplyDeleteYou are welcome!
DeleteThank you for this cute pattern
ReplyDeletehello from France