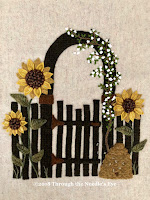
 Because of my trip to Europe in August, we took a hiatus from our Block of the Month, but we are back to finish this quilt! On Sunday, I (Teri) taught the class on our newest block, Garden Gate, at Primitive Homespuns Wool & Needleworks in Frederick, MD. As always, we had lots of fun as we reviewed the techniques used to create this block. And the shop has just moved into a larger building, so we enjoyed a bit more room in which to stitch! A happy respite from our rainy day.
Following are a few highlights for creating the Garden Gate, which is now available on our website.


Our beautiful new space allotted us plenty of room to spread out and stitch. As you can see above, I have the blocks assembled and am preparing for the borders and quilting next.


We had to do a bit of puzzle work to fit all the gate pieces onto the piece of wool that we had. Here is how one person got hers arranged so everything fit.
Kara actually made this particular block, and her biggest piece of advice was to fuse the gate pieces. I tend to prefer stapling my pieces, but she said that because the piece was so large, she had to fuse the rails to be sure they didn't shift. Someone in class yesterday said that her pieces never stay fused. We discussed the possibility of using steam on a wool setting, and pressing it from the front and then the back for better hold. You could also fuse AND staple and/or pin, as Kara did above!
After the arch and railings are appliquéd to the background, stitch the hinges and capstones.


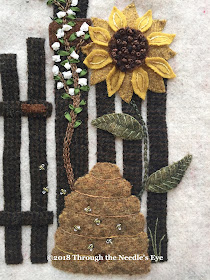
For the sunflowers, appliqué the back petals, and then use a stem stitch in the center of the front petals, echoing the edge. Kara added a bit of batting beneath the brown center before she appliquéd it down, and then added French knots, using a mixture of ribbon and floss for the seeds.
We placed the flowers before stitching the stems and leaves.


The flower stems are done using either chain stitch or the Hungarian braided chain. The Hungarian braided chain is used on the Cornflower block; you can see how to do it by clicking here. The leaves are then stapled, pinned, or fused in place, and surrounded by a blanket stitch with angled spokes creating the veins. To see another example of this leaf treatment, check out the Dragonfly and Fern leaves by clicking here.
A finished leaf
The beehive is appliquéd and embroidered. Brown pearl cotton is used for the rose stem (chain stitch) and roses are added, using the gathered French knot with white silk ribbon. It is the same ribbon stitch used to create the Butterfly Bush, which you can see modeled by clicking here.
The roses will be scattered amongst the stems, and leaves are added with green silk ribbon using the ribbon stitch. The ribbon needed to create the roses, leaves, and sunflower seeds is included with the pattern.
And you can't have a beehive without bees! These little bullion bees are just SO fun. We had a great time making them in class.
Thread a large milliners needle with two pieces of size 12 pearl cotton: one each of yellow and black.


Carefully wrap the threads around your needle so that the two colors alternate—about five wraps.
Pull the needle through the wraps gently, and take the thread to the back at the end of the stitch.

All you need are wings, made by two small loops anchored with a tack stitch hidden beneath the bullion body, using one strand of white floss.
Cutest little bees ever!
It's never too late to join us In the Garden! We have one more block to go, and then we are ready to do the border and assemble the quilt. We would love to see photos of any of the blocks you have done. You can email them to us, or share them on our Facebook page.
All the patterns, which include any ribbon needed to complete the block, are available in our website store. To read more about our other blocks in the series, click on the links below.
- Introducing "In the Garden," A BOM Series: Cornflowers
- "In the Garden"—Oak Leaves and Acorns
- "In the Garden"—Violets
- "In the Garden"—Cardinals and Holly
- "In the Garden"—Rose
- "In the Garden"—Robin and Forsythia
- "in the Garden"—Dragonfly and Fern
- "In the Garden"—Hummingbird and Fuschia
- "In the Garden"—Hydrangea
- "In the Garden"—Monarch and Butterfly Bush


Really pretty pattern and a lot of great sewing tip. Thanks very much!
ReplyDeleteThank you, Teri...and you're welcome!
DeleteFantastic blog you have here. You’ll discover me looking at your stuff often. Saved! Yaldo Eye Center Grand Rapids
ReplyDelete