Showing posts with label hand quilting. Show all posts

Thursday, March 25, 2021

What's Stitching?

Over the course of the last two weeks, Teri shared about the first installment of our Village Wanderings project that she taught at the Academy of Appliqué. Much to my dismay, I (Kara) was unable to make the trip to the Academy this year, due to travel restrictions here in Europe. We did a little stitching session via video, but it wasn't quite the same. Although the lockdown is quite restrictive here in Germany, I have been keeping the stitching home fires burning for future projects, and today, I thought I would share some little picture hints of what I have been stitching. 

Maybe you can guess what we have in store!


We love the look of hand quilting, but it does take a lot of time. My plan for our Fraktur quilt is to chip away at it a little bit at a time...


...but the pinwheels are never ending!


Another thing that is keeping us busy, is turning some of our past Academy projects into patterns and kits that will be available on our website. One of the blocks, Oiseau et Panier, needs to be taken from a lowly block into a quilted beauty before we can pattern her for the website.

These hands have not been idle for sure, but I have a slight sense of urgency to get these projects finished before the movers come to take all my stitching stuff and put it on a boat with the rest of our belongings. It is hard to believe, but in less than 2 months, we will be heading back stateside. In the meantime, I will be stitching feverishly, so that when I get back, we can share full pictures of our exciting new projects!

What's stitching at your house?

Friday, October 16, 2020

Maybe I CAN Be a Quilter

This past summer, we—along with eleven other designers—participated in a Mystery Stitch-Along. Our block was the Harvest Basket, which you can read about by clicking here. Kara and I (Teri) each stitched the block, as one was destined to be stitched into the Woolen Oak Mystery Quilt, and we wanted to keep one. I decided to create a small wall hanging with the one I made.

I thought I would just do a small border of one-inch squares, pulling colors from the basket block. Color is my favorite part of the process, so this took me an afternoon of playing with fabrics to be sure I had a balance of colors and value. I always look at my pictures in black and white to be sure that I have light, medium, and dark colors. Once I had stitched the first border, I realized that more than one row of these colorful blocks would distract from the basket, so I planned to pull the neutral into a small outer border.


I wanted to appliqué the word Thankful on the top border, so I played around with my fonts to get the right look and size. I chose Snell Roundhouse, which I bolded and sized at 130 points, and added a six-point outline. I printed and glued it to freezer paper, carefully cut it out, ironed it onto my wool, and cut again. It was tedious scissor-work, but worth it. 

I appliquéd the word and embroidered around it using an outline stitch, and then I added the oak leaves and acorns from the block pattern. 

The finished top

Now, the challenge I faced was to quilt it. Years ago, I tried to become a machine quilter, but never felt comfortable with anything but stitching in the ditch, or straight lines. I could never achieve the "perfection" I craved with free-motion quilting, and there wasn't enough wine to relax me into enjoying the process. And the more I fell in love with hand-stitching, the less time I wanted to spend on my machine.

For a long time, I was content to consider myself a top-maker—and as I began to appliqué, even a block-maker—being perfectly happy to let someone more talented in quilting be the quilter. But I have had the desire to make the attempt to master this skill, and have completed a few small projects using big-stitch quilting. This was my first real foray into standard hand-quilting. It is a small project, and I was ready to try and allow myself some imperfections. (In my mind, that is the key!)

I chose to use a hoopless method. As most of my quilting design was planned around outlining motifs and straight lines, I felt that I had a good opportunity to become more comfortable with the skill. My stitches are not tiny, but they are fairly consistent. I was pleasantly surprised by the fact that I really enjoyed the process. It was comforting and relaxing to just sit and stitch.  

Using a finger cot helped to pull the needle through, but the ones that I had were wearing out, so I cut the finger off of a kitchen glove, which alleviated some of the hand discomfort of gripping the needle. It was a cheap and easy solution, and it didn't tear.

The quilting from the back

I chose simple as far as a quilting pattern; I outlined the appliquéd motifs, and echoed the acorn in the background. Within the acorn, I quilted vertical lines to mimic the lines on an acorn, and cross-hatched the cap. My stitches improved as I quilted, and the outer border stitches are consistently smaller and a bit more uniform. It isn't perfect, but I am satisfied that my skills improved, and I'm happy enough with it to hang it on my wall.

When I was choosing my border fabrics, I was seeking a perfect print that incorporated several of the colors to use as my binding. The one piece I found that worked was part of a jelly roll; however, it was one of the few that only had one strip, so I wouldn't have enough. I was pretty much settled on using brown, to pull the color from the basket (and we have a propensity to bind and border a lot of our quilts with brown.) But the other day, I was looking at this quilt hanging on the wall, and I recognized that the colors in the fabric in this quilt would match perfectly. Some people have a photographic memory, but sometimes I wonder if there is such a thing as a "colorgraphic" memory. I instantly knew it would be a perfect match. I just hoped I had enough left in my stash. 

 
To read more about this quilt, read our post entitled Turning to Him.

I was happy with the color match when I pulled the piece from my closet, and I had plenty to bind my small wall hanging.


The quilting makes the design come to life!

It takes a pair of really sharp scissors and good cutting skills,
but I love the way the lettering turned out on the top border.


I had successfully convinced myself that I could never be a quilter, that my skills could never be adequate and I would ruin my appliqué work if I attempted to quilt it myself. Thankfully, I ventured into the quilting arena, allowing myself to be imperfect and to do my best. I know where I could have improved and where I was less than perfect, but perfection isn't everything. I learned that I can improve, and I actually really enjoyed the process. And I don't feel as though I ruined my quilt top. I think sometimes I am my own worst enemy. Maybe I CAN be a quilter, and not just a topmaker! 

P.S. We do still have patterns and kits available for the Harvest Basket center block on our website: needleseyestories.com/shop


Thursday, April 16, 2020

Quaranstitching: West of the Atlantic (With a Mask Tutorial!)

Last week, Kara shared what she's been working on east of the Atlantic during our Stay at Home time, both stitching and otherwise. Today, it is my turn to share the "quaranstitching" projects under my needles. At this point, I have several things going at once, so depending on how energetic I'm feeling, I can choose to be creative, or just stitch without much thought—enjoying the sheer process of the needle, thread, and fabric coming together.

My first project (after I did some organizing in my sewing studio) was to work on another block from our Woodland Reverie quilt. Before leaving for the Academy, I had stitched the blue frames and the stems; I was just beginning the process of fussy cutting the leaves while I was in Williamsburg. Color selection is always the most enjoyable—albeit occasionally daunting—part of the process. This block experienced many possible iterations before I settled on this palette. The whole personality of a block can change with different color choices, which makes this project so much fun, especially with the light and dark backgrounds.

My final block, with a limited number of colors

Kara's more colorful version: I love the way each flower has a subtle reference to the colors of another bloom, pulling out the orange and purples.


Next on my list of stitching to-dos was to prepare my Baltimore Fraktur quilt top for hand quilting. The center block of this wall hanging is one of our classes at Baltimore on the Prairie in September. Wool is a challenge to quilt, so I planned to use big stitches with pearl cotton. 


I used a wool batt and pin-basted the layers together. In the center, I used a neutral thread (Valdani pearl #12) and quilted around the appliquéd elements. For the pinwheel blocks, I am using a Painters Threads hand-dyed pearl #12 to echo the seam lines. I wasn't sure if I would like it, so it was a chance to take, but it I am enjoying the process. As I make more progress, I think I even like the result. A good thing, as I'm not sure with the thicker thread that I could turn back now!


Progress


Mask-making had been on my mind, as our local hospital requested that the local chapter of the Embroiderers' Guild of America make cotton masks for donation. They gave us a specific pattern to follow, which looked pretty simple to make. Click here for the pattern I used. I found a couple packages of elastic, so I spent a day going through my batik stash (a finely woven cotton) and making a bunch of masks. By the end of the day, my family members had claimed most of the ones I made, with special requests for the grandchildren, as well. A few Star Wars masks may have made the pile...

Not bad for a day's work!

 If you haven't found a pattern yet, here is a quick visual of my process:

Cut two pieces at 6"x9".

Sew around the edge, inserting elastic (per instructions),
leaving an opening for turning.

Turn and press. 


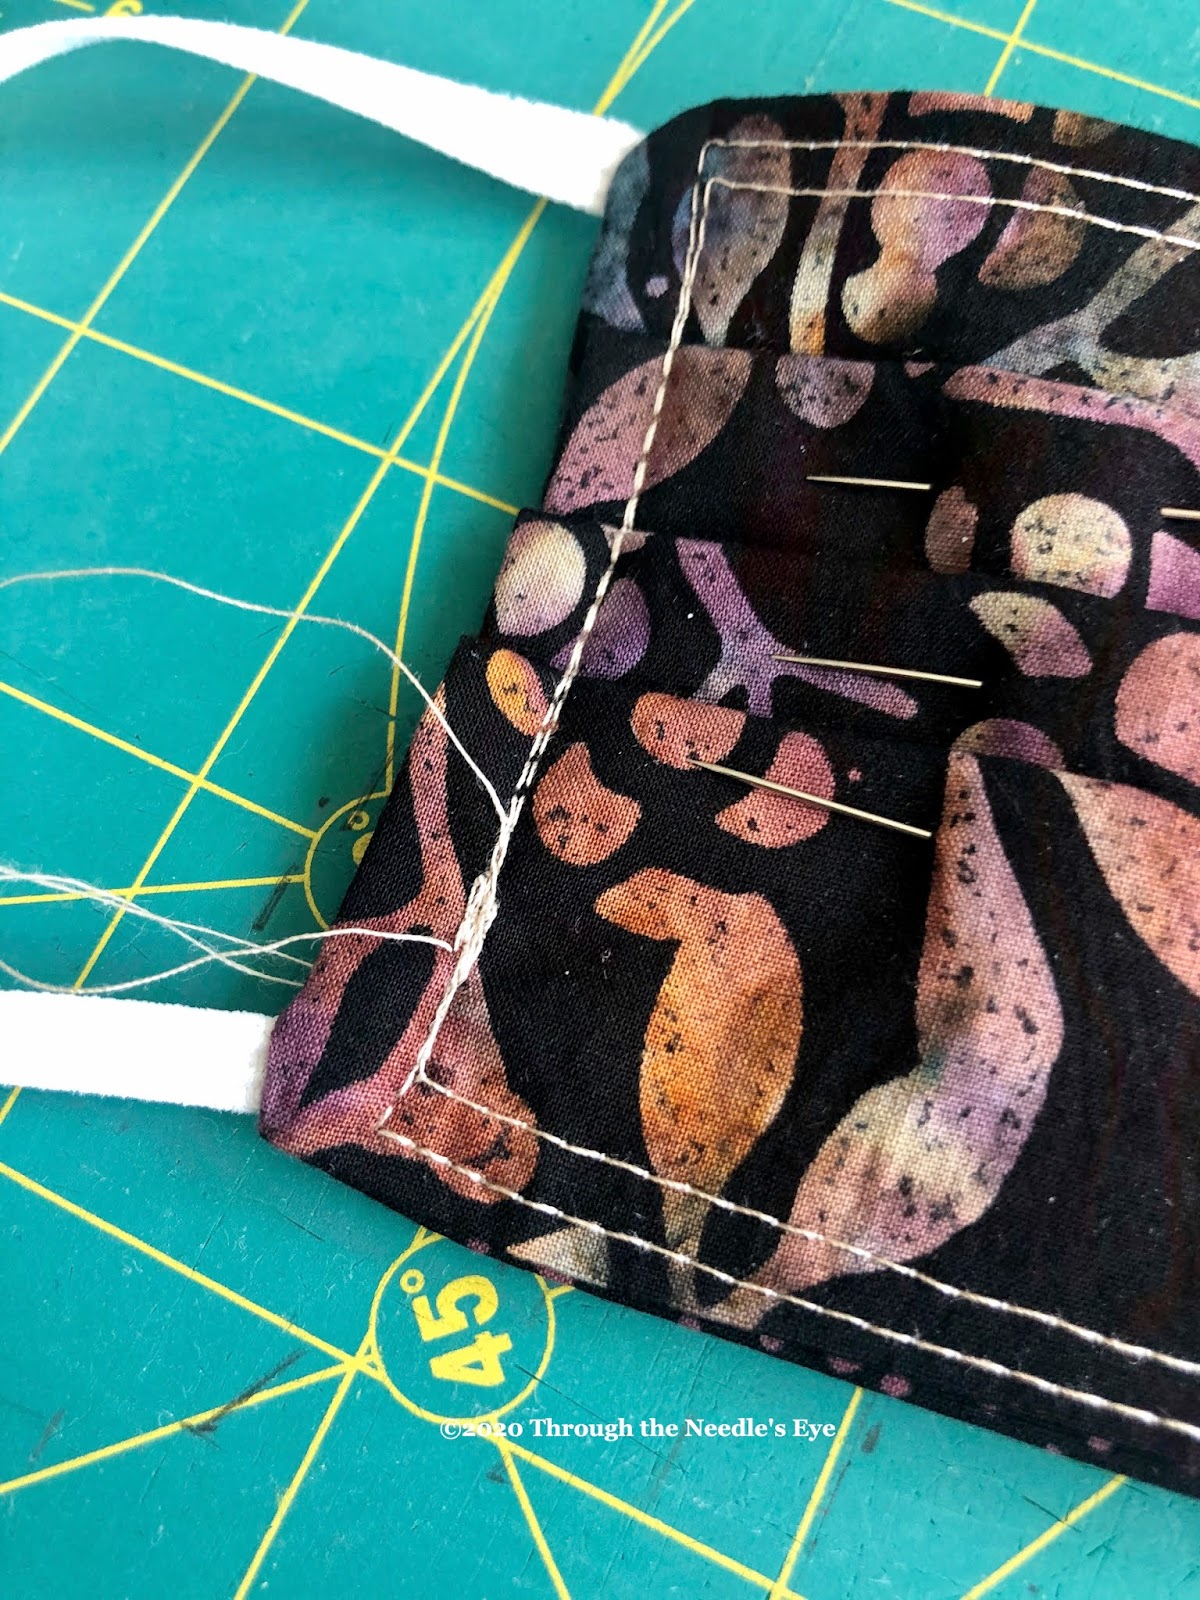
Make three pleats; pin.

Lock stitch, needle down. I started on a side and stitched 1/4-inch from the edge.

Stitch around the piece. On the top and bottom, I stitched about 1/8-inch from the edge to be sure I caught and closed the opening for turning the mask.

Stitch a second time around, reinforcing the 1/4" on the sides to be sure elastic is secure, . . .

. . . and continuing at 1/4-inch on the top and bottom.

Lock stitch and trim. 

Use different fabrics so there is an inside and outside, a revelation I had after I made the first 20 masks. These can be laundered, preferably in hot water. 


When I was in Williamsburg, I passed off my fairy tale redwork quilt top to longarm quilter Beth Filko. She worked some amazing magic on it! I received it this week and have already put on the hanging sleeve and binding. It is just waiting for me to hand stitch it down, and then you will see the big reveal. Can't wait!


And when I feel creatively energetic, I tackle this new wool appliqué project, which mixes a variety of fun textures. Inspiration? An old cupboard from Alsace! One advantage to our tiny company of two being separated by an ocean is the abundance of influences for our designs. 


I can honestly say that we have cooked more meals and washed more dishes this past month than we have in years. My husband typically is the cook in our household, but I have even had to step in and give him a break. We do miss being served our food, but I'm not going to lie: we have had few pizzas as good as this one my hubby made on the grill. When he gets creative in the kitchen, it is not a bad thing!


And it is springtime, so there's the garden!

What about you? What are you spending your quaranstitching time doing? New projects? Finishing old ones? Or project hopping, like I am? Please share in the comments on the blog!


Postscript: I may have just received an order of 600 yards of elastic cording which I am hoping will work for more masks. My son tells me his friends are coveting his Star Wars mask, so I suppose there will be a few more of those under my needle. I have thus far made 30 masks, which have all been claimed by family members and neighbors. I think I'll be making masks for a couple of days, so some can be passed on to the hospital. What a great way to help others and bust a bit of my stash.