Showing posts with label ribbon roses. Show all posts

Thursday, February 6, 2020

Stitching a Sampler and More!

This time of year for Teri and me (Kara) is a little crazy. We are getting prepped and ready for our Academy of Appliqué class, and this year we have two new teaching venues, all around the same time. Needless to say we are stitching, cutting, and typing our little hearts out!


Our first class will be our Academy class, and we are teaching the first two blocks from our Woodland Reverie Quilt. We are excited about these two dimensional blocks, and we hope our students are, too! There are a few seats left in the class, so if you would like to join us, you can contact Barbara Blanton at The Academy of Appliqué.

Autumn


The next class we will be teaching is our very first pattern, Marcia's Flowers. This class will be with the Colonial Piecemakers Quilt Guild, and we will also be doing our lecture The Stories in Our Quilts. We have quite a few new quilts that we have acquired, so it is going to be a lot of fun to share some new stories.


The last class we will be teaching will be in mid-March for the Milltown Quilters guild in Columbia, Maryland. Again, we will be doing our lecture, but we have a brand new class and project to introduce. This group really wanted a class that focused primarily on ribbon and what we as quilters and appliquérs can do with it. We wanted to create a class that gave our students a little more to go home with than a practice sheet and some flowers that might get lost along the way. Thus, our Ribbon Basics class was born, along with a pattern to store our sampler of ribbon stitches and hold our beautiful ribbon flowers.

Our sampler book

Each student will be given our ribbon sampler sheet to practice their stitches on, along with threads and silk ribbon. 

Sampler sheet

A pocket for flower and leaf samples
We will also be making some flowers with wired ribbon, bias silk ribbon, and seam binding ribbon. In the class, we will have baggies to hold the made flowers and extras, but we thought it would be nice to put it all together in a simple booklet that has a place for said flowers, as well as an easy location to refer to the learned embroidery and ribbon stitches. In the class, our students will receive all the instructions for putting their sampler booklet together.


The booklet folds up neatly so everything is contained and easily referenced.

All open

Flip the pocket up.

Fold up again...

...and neatly tie it closed.

This will be a handy reference tool for some of the stitches we will teach in class, but there are so many stitches to learn that we thought it would be good to leave some space to add more pages.

Another page to add

Time to get stitching on the second page!

We would love to teach any of the classes described above at your guild, and we love to travel! Sometimes you might get both of us, or depending on which side of the pond you are on, it might be just one. If you have any questions about any of these classes or any other classes on our website, please contact us at www.needleseyestories.com

Happy Stitching!

Tuesday, December 4, 2018

Christmas Present Ideas


Are you frantically sewing for Christmas and the holidays? Are you trying to get all the sewing done in addition to the other daily projects? Things can get a little crazy for stitchers around the holidays. We want to give our best to our family and friends, but we all probably wish we had started these projects sooner. Regardless of the late hour, we will stitch till our fingers are sore, and we will be happy when each gift is finished. After all the holiday stitching, wouldn't it be nice to sit with a bunch of your friends and just stitch in a relaxed atmosphere with no deadlines (and no laundry)? Well, have we got the place for you! 


The Academy of Appliqué in Williamsburg, Virginia, is just the right spot for a few days—or even a week—of stitching with old and new friends. You will get to learn a new skill or two, someone else cooks and cleans for you, and you get to meet like-minded stitchers. The Kings Mill Resort location is beautiful, and the class selection is varied, taught by world-renowned teachers. We just found out that there are a few spots open in both of our classes, Botanical Beauties and Lovely Vase. Though the classes are separate, the two projects can be combined to make our quilt, Lovely Botanicals. We just found out that the quilt has come back from being quilted by Bellwether Dry Goods, and we are so excited to see how it turned out. We promise to post pictures!

Botanical Beauties

Lovely Vase

Lovely Botanicals

While we would love for you to take our classes, there are many other wonderful classes still available. All you have to do is go to website, Academy of Appliqué and take a look.

It's not too late to put "a trip to the Academy of Appliqué" on your Christmas list. Who needs more underwear when you could stitch for a week! Or maybe you just want to treat yourself after a long year—you deserve it, don't you? No matter the reason you go, we think you will have an absolutely wonderful time, and we would love to see you there!


Thursday, October 4, 2018

Petite Floral Wreath

Last year in Sainte Marie Aux Mines at the European Patchwork Festival, I (Kara) sat next to a friendly woman from around the Frankfurt area. She was a quilter, an American and an all around lovely person. We struck up a conversation which nine months later, led to an offer to teach at her guild! It's funny how teaching opportunities come along. The next question was what class would they like taught? Our Floral Wreath caught their eye but that is a two (really three) day class so we decided to make a smaller version that would fit into a one-day class.

The smaller version.

Our smaller version has all the ribbon flowers of the first block but we have scaled it in size so that we could fit it all in one day. Here are a few close-ups of our latest block.


We used two new colors with the purple and orange silk
and we love them!
Hanah bias silk makes the best pansies.


As this class may have some students new to appliqué, we have simplified the clematis.
and used embroidery to give it depth.

Gathered ribbon roses are always fun to teach.
Can you believe this rose uses the same ribbon
as the rose on the left?


Leaf made with ribbon fly stitches.


Baby's breath


Turkey work centers for the clematis

Getting the supplies ready.
Kits in the making.


It will be a lot to accomplish in one day but I am excited to have a teaching opportunity here in Germany! As winter approaches, it's alway fun to create a little bit of spring and summer with ribbon. I'm looking forward to the Petite Floral Wreath class later this month at the Rheinland Pfalz Quilt Guild. It will be great to meet new stitchers here in Germany that love appliqué and are eager to have some fun with ribbon!

Teaching how easy and fun it is to make realistic flowers out of ribbon and appliqué is one of our favorite things to do. If you would like to learn how to make wonderful ribbon flowers and learn how to embellish your appliqué, there is a wonderful opportunity to do so in March of 2019 at the Academy of Appliqué in Williamsburg, Virginia.

Click here for more information about this fantastic venue!

Teri and I will be teaching two classes next March at the Academy: Botanical Beauties and Lovely Vase. Both classes will give the student plenty of skills to make wonderful floral creations out of ribbon as well as learning some embroidery skills to enhance your appliqué. 

Botanical Beauties

Lovely Vase

We hope to have a few kits left over to put on our website after the Petite Floral Wreath class but if your guild would like to host this class or any others, please let us know. Whether you are on this side of the pond or the other, we would be happy to come.  If you are interested in either of the Academy classes, please click on the links above to register. We'd love to see you there!

Thursday, September 13, 2018

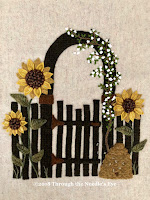
"In the Garden"—Garden Gate

Because of my trip to Europe in August, we took a hiatus from our Block of the Month, but we are back to finish this quilt! On Sunday, I (Teri) taught the class on our newest block, Garden Gate, at Primitive Homespuns Wool & Needleworks in Frederick, MD. As always, we had lots of fun as we reviewed the techniques used to create this block. And the shop has just moved into a larger building, so we enjoyed a bit more room in which to stitch! A happy respite from our rainy day. 

Following are a few highlights for creating the Garden Gate, which is now available on our website.


Our beautiful new space allotted us plenty of room to spread out and stitch. As you can see above, I have the blocks assembled and am preparing for the borders and quilting next.

 
We had to do a bit of puzzle work to fit all the gate pieces onto the piece of wool that we had. Here is how one person got hers arranged so everything fit. 

Kara actually made this particular block, and her biggest piece of advice was to fuse the gate pieces. I tend to prefer stapling my pieces, but she said that because the piece was so large, she had to fuse the rails to be sure they didn't shift. Someone in class yesterday said that her pieces never stay fused. We discussed the possibility of using steam on a wool setting, and pressing it from the front and then the back for better hold. You could also fuse AND staple and/or pin, as Kara did above! 


After the arch and railings are appliquéd to the background, stitch the hinges and capstones. 

 
For the sunflowers, appliqué the back petals, and then use a stem stitch in the center of the front petals, echoing the edge. Kara added a bit of batting beneath the brown center before she appliquéd it down, and then added French knots, using a mixture of ribbon and floss for the seeds.

We placed the flowers before stitching the stems and leaves.

 
The flower stems are done using either chain stitch or the Hungarian braided chain. The Hungarian braided chain is used on the Cornflower block; you can see how to do it by clicking here. The leaves are then stapled, pinned, or fused in place, and surrounded by a blanket stitch with angled spokes creating the veins. To see another example of this leaf treatment, check out the Dragonfly and Fern leaves by clicking here.

A finished leaf

The beehive is appliquéd and embroidered. Brown pearl cotton is used for the rose stem (chain stitch) and roses are added, using the gathered French knot with white silk ribbon. It is the same ribbon stitch used to create the Butterfly Bush, which you can see modeled by clicking here

The roses will be scattered amongst the stems, and leaves are added with green silk ribbon using the ribbon stitch. The ribbon needed to create the roses, leaves, and sunflower seeds is included with the pattern.

And you can't have a beehive without bees! These little bullion bees are just SO fun. We had a great time making them in class. 

Thread a large milliners needle with two pieces of size 12 pearl cotton: one each of yellow and black.

 
Carefully wrap the threads around your needle so that the two colors alternate—about five wraps.

Pull the needle through the wraps gently, and take the thread to the back at the end of the stitch. 

All you need are wings, made by two small loops anchored with a tack stitch hidden beneath the bullion body, using one strand of white floss.

Cutest little bees ever!

It's never too late to join us In the Garden! We have one more block to go, and then we are ready to do the border and assemble the quilt. We would love to see photos of any of the blocks you have done. You can email them to us, or share them on our Facebook page.


All the patterns, which include any ribbon needed to complete the block, are available in our website storeTo read more about our other blocks in the series, click on the links below.