Thursday, September 27, 2018

Marcia's Flowers: A Thursday Throwback

So it's one of those weeks. Kara just got home from traveling to a family wedding and is dealing with jet lag, and I (Teri) am preparing to travel to Long Island to lecture and teach for a guild. So when we touched base this morning about what we should write, we thought it might be a perfect week to do a throwback to our most popular post. That post would be Marcia's Flowers—by far! 

This was our very first pattern, and it continues to be a popular one. We are still teaching the class, and even occasionally getting to see some finished projects—always a real treat for us. Seeing projects based on our classes and patterns gives us great joy!

Last week at a workshop, Pat H. shared her Marcia's Flowers mat.
The beads add a nice touch, and I love how she finished it with the scalloped edge!

Thanks primarily to Pinterest, we are still getting lots of traffic on this original post. In light of our busy week creating writer's block, we thought we might make it easier for you to review. Enjoy!


💮💮💮💮💮💮💮💮💮💮💮💮💮💮💮💮💮💮💮💮💮💮💮💮

Thursday, September 15, 2016


Marcia's Flowers


In July, Kara shared The Story of an Inspiring Jacket with you. Today, I (Teri) will show you what we have each done with the design created from that jacket. These projects have been such fun, and we hope to share the joy with you. We are excited to teach this class at Primitive Homespuns Wool & Needleworks in October, in Frederick, MD. 


When we first met Kathy, the owner of the shop, she asked if we could design a wool appliqué piece that could be used to top a wooden box. Kara had already started working on this pattern in bright colors by Shakerwood Woolens, and we took it in to show to her. Kathy thought that the design would be perfect, so I selected a palette of colors from her shop to stitch my model. As I love warm colors, my model has a very different look from Kara's. Our two examples show how the same pattern, with the same embroidery stitches, can look so very different! 

Here are a few side-by-side detail shots for you to compare. 


Sometimes a different look is achieved because of different thread choices, or even because of the density and weave of the wool. The purple wool on the outer petal of the above flower, left, held the scalloped cut. The teal, on the right, however, was a looser weave, so I chose to fray it with the back of my needle, so it would look more feathery.


For our class at Primitive Homespuns, we will be using the warmer palette and making a lovely box that would be perfect for storing sewing supplies, threads, or even used as a project box for appliqué or embroidery pieces. I went to the shop yesterday to work with Kathy to secure the finished piece on the top of the box, which she had painted a lovely brick red. First, I backed the finished piece with muslin, using SoftFuse Premium™ as my fusible. Then I trimmed it to size, and we backed it with Shurtape® double-sided carpet tape. Kathy has this process down to an art; I was impressed watching her trim the tape to the size of the appliqué, and methodically remove one strip of backing paper at a time to carefully secure it to the box with proper placement.


We auditioned several examples of trim, including discussing a blanket stitch around the edge of the block, but we settled on a lovely vintage chenille yarn, which we glued down using Aleene's® Original Tacky Glue®. The color matched the pale yellow used in the block and gave it a nice, finished look without distracting the eye from the design.


While I was stitching up my model, I put a photo of my embroidery on a Facebook group and was astonished by the number of requests there were for the pattern. So we decided that it only made sense to write up directions and create a formal pattern. We have been working hard to get it ready, and it should be up on our website by October. But in the meantime, if you live in the Frederick area of Maryland, come join us for some Saturday fun! (For more information about the class, please check our website, by clicking here.)* 


We thought it would be fun to put our two projects together for a photo session; here they are sitting on a chair together in the shop. You can see that Kara decided to stitch hers into a pillow, and she just happened to have the perfect fabric to match her appliqué! What would we do without such an extensive fabric stash?!


Marcia's Flowers


💮💮💮💮💮💮💮💮💮💮💮💮💮💮💮💮💮💮💮💮💮💮💮💮

*NOTE: We don't happen to currently have a class scheduled for this block, but if there is interest, we can always add one! And, for the record, the patterns ARE now available on our website, in both digital and hard copy!

Have a wonderful weekend, everyone!!


Thursday, September 20, 2018

Block of the Month 12—Thistle

Thank you for your interest in our Flora and Fauna blocks! They are no longer free but will be part of a future quilt pattern.

We have come to one year of our Flora and Fauna of Germany blocks. Originally, the plan was to stop at a year, but we are going to continue for a little while longer because the blocks are so much fun! 

This month's block is a bit prickly but beautiful in its own way and is actually a member of the sunflower family. In Celtic symbolism, the thistle represents bravery, devotion, and determination; however, in Victorian times, the thistle was a sign of meddling or intrusion. 

In Scotland, there is a legend that Viking invaders came to the Scottish coast with plans of conquering the sleeping Scots. While trying to be stealthy, they came ashore barefoot, stepped on thistles, and their cries of pain alerted the Scots to the impending invasion. Thankfully, our block version of this historical plant is all beauty, and hopefully, no pain.


Cotton Block 

This block is simple to appliqué and embroider and will go together quickly, as the only stitch used is the straight stitch! The stitch lines on the pattern are just guidelines—fill in your thistle flower and base with straight stitches until it looks good to you.

The appliqué is finished and the straight stitches started.

Straight stitches using two strands of floss make up the purple part of the flower,
and I used a #12 pearl cotton for the green.  

The finished block!

My pearl cotton and floss

Stitches and Threads Used (Cotton Block)

Thistle top—Six-stranded floss, 2 strands, straight stitch
Thistle bottom—Painters Threads, Turner, #12 pearl cotton, straight stitch


Wool Block

Thistle tops vary in color from pink to purple, and I decided to go with a purple thistle for both blocks. Only small scraps of wool are needed for this block and I had just the right green and purple in my scrap drawer. When Teri and I were in Birmingham, we met a wonderful vendor selling some vintage linen threads. This project seemed perfect to give those a try.

Staples worked well with the little scraps.

The stems of real thistles vary from green to brown. I decided to make the stems
of the wool thistle in brown using a chain stitch with linen thread.

Purple wool thread was perfect for the thistle top.

The finished block!

My linen and wool threads

Stitches and Threads Used (Cotton Block)

Thistle top—The Gentle Art Simply Wool™,  Hyacinth, straight stitch
Thistle bottom—Lingarn linen thread, green, straight stitch
Thistle stem—Lingarn linen thread, brown, chain stitch

We have a visit to Scotland coming up, and I hope to see this Scottish emblem while I'm there. Thankfully, there were no Viking invaders around when I stitched this block, but I loved how it turned out and how simple it was to make. I'm looking forward to adding this block to the collection. 

Stay tuned for a sneak preview in the future of how these blocks are coming together—and as always, if you have stitched any of these blocks, we'd love to see them!!


Thursday, September 13, 2018

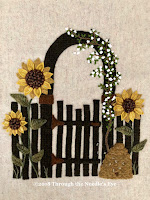
"In the Garden"—Garden Gate

Because of my trip to Europe in August, we took a hiatus from our Block of the Month, but we are back to finish this quilt! On Sunday, I (Teri) taught the class on our newest block, Garden Gate, at Primitive Homespuns Wool & Needleworks in Frederick, MD. As always, we had lots of fun as we reviewed the techniques used to create this block. And the shop has just moved into a larger building, so we enjoyed a bit more room in which to stitch! A happy respite from our rainy day. 

Following are a few highlights for creating the Garden Gate, which is now available on our website.


Our beautiful new space allotted us plenty of room to spread out and stitch. As you can see above, I have the blocks assembled and am preparing for the borders and quilting next.

 
We had to do a bit of puzzle work to fit all the gate pieces onto the piece of wool that we had. Here is how one person got hers arranged so everything fit. 

Kara actually made this particular block, and her biggest piece of advice was to fuse the gate pieces. I tend to prefer stapling my pieces, but she said that because the piece was so large, she had to fuse the rails to be sure they didn't shift. Someone in class yesterday said that her pieces never stay fused. We discussed the possibility of using steam on a wool setting, and pressing it from the front and then the back for better hold. You could also fuse AND staple and/or pin, as Kara did above! 


After the arch and railings are appliquéd to the background, stitch the hinges and capstones. 

 
For the sunflowers, appliqué the back petals, and then use a stem stitch in the center of the front petals, echoing the edge. Kara added a bit of batting beneath the brown center before she appliquéd it down, and then added French knots, using a mixture of ribbon and floss for the seeds.

We placed the flowers before stitching the stems and leaves.

 
The flower stems are done using either chain stitch or the Hungarian braided chain. The Hungarian braided chain is used on the Cornflower block; you can see how to do it by clicking here. The leaves are then stapled, pinned, or fused in place, and surrounded by a blanket stitch with angled spokes creating the veins. To see another example of this leaf treatment, check out the Dragonfly and Fern leaves by clicking here.

A finished leaf

The beehive is appliquéd and embroidered. Brown pearl cotton is used for the rose stem (chain stitch) and roses are added, using the gathered French knot with white silk ribbon. It is the same ribbon stitch used to create the Butterfly Bush, which you can see modeled by clicking here

The roses will be scattered amongst the stems, and leaves are added with green silk ribbon using the ribbon stitch. The ribbon needed to create the roses, leaves, and sunflower seeds is included with the pattern.

And you can't have a beehive without bees! These little bullion bees are just SO fun. We had a great time making them in class. 

Thread a large milliners needle with two pieces of size 12 pearl cotton: one each of yellow and black.

 
Carefully wrap the threads around your needle so that the two colors alternate—about five wraps.

Pull the needle through the wraps gently, and take the thread to the back at the end of the stitch. 

All you need are wings, made by two small loops anchored with a tack stitch hidden beneath the bullion body, using one strand of white floss.

Cutest little bees ever!

It's never too late to join us In the Garden! We have one more block to go, and then we are ready to do the border and assemble the quilt. We would love to see photos of any of the blocks you have done. You can email them to us, or share them on our Facebook page.


All the patterns, which include any ribbon needed to complete the block, are available in our website storeTo read more about our other blocks in the series, click on the links below.