Showing posts with label quilt. Show all posts

Thursday, October 21, 2021

A Rose by Any Other Name...

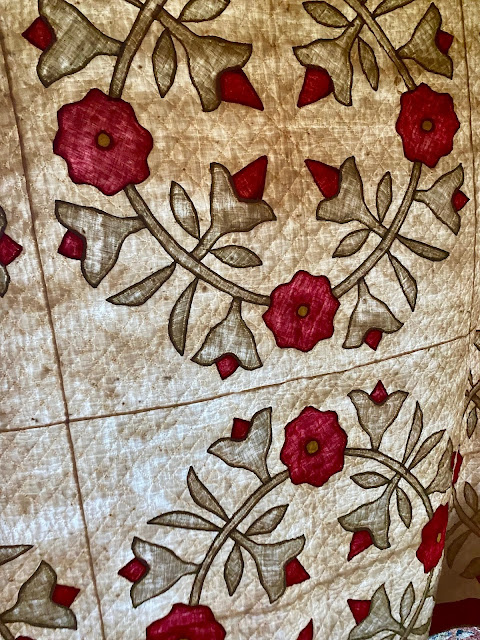
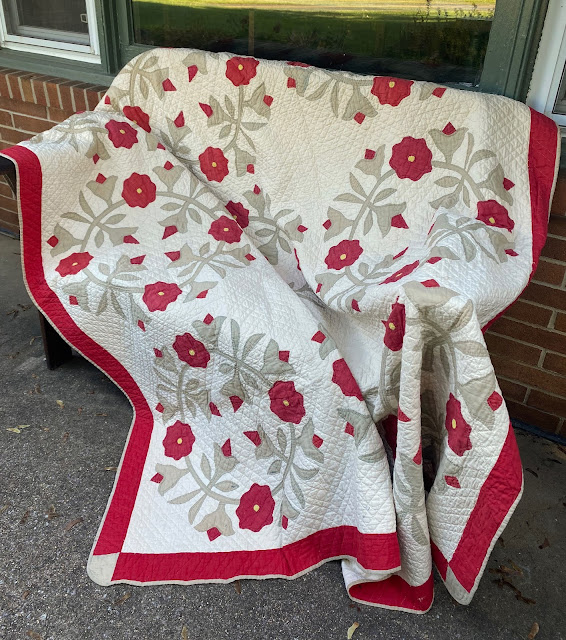
If you have been reading our blog for a while, you will know that Teri and I (Kara) have a love for all things vintage, especially quilts. Over the past few years, our collection has grown, and while most of my quilts are still in storage, that hasn't stopped me from purchasing a few more since I have been back stateside. My most recent purchase was a quilt style that I have been hoping to add to my collection—an appliqué quilt—and the Rose of Sharon block is one of my favorites. This Rose of Sharon quilt may be the closest thing to a Baltimore Album quilt that I may ever own. The pattern, sometimes called a Whig Rose, is quite old and often used in Baltimore Album quilts. Unfortunately, my current budget does not include purchasing an album quilt should one come up for sale.

I haven't had a chance to take it to my favorite appraiser, Phyllis Hatcher, but I do know a few things about it. It most likely came from North Carolina and the auction house gave a time period of the first quarter of the 20th century. I think it might be a little older than that, but I will have to wait and see. 


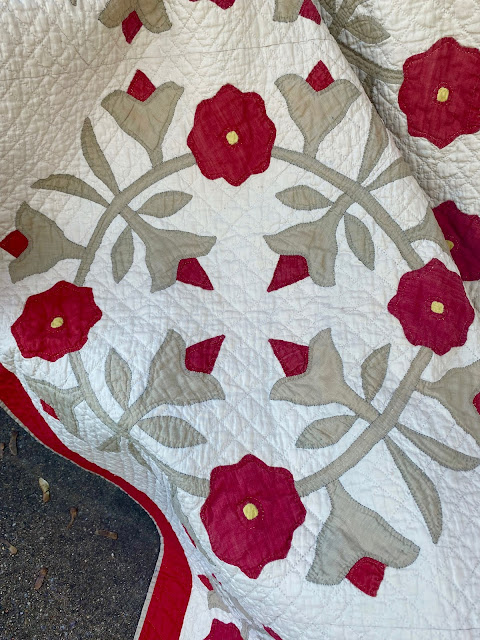
It is apparent in a couple of spots that the tan areas used to be green and have degraded over the course of time. There are just a few spots that show what the green looked like before it faded


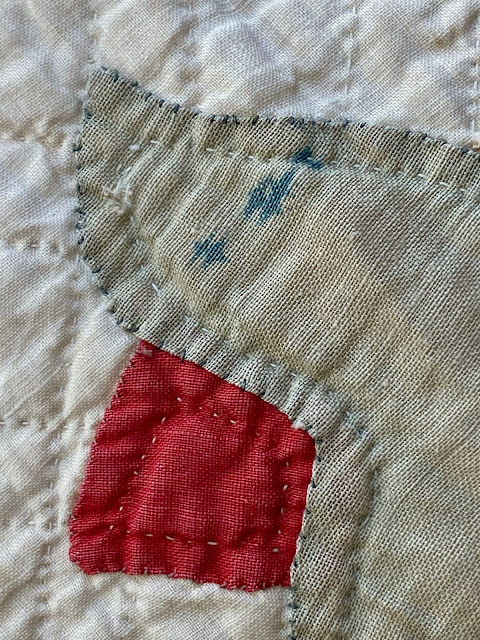
I am hopeful that the red is Turkey Red and will have that confirmed when I take it to be appraised. The fabric has a similar look to a Turkey Red Snowball quilt that I already own.


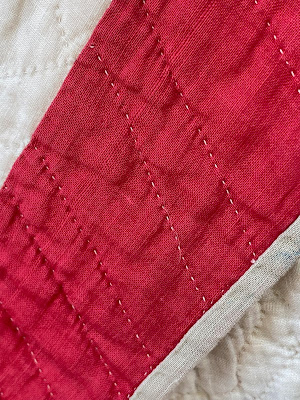
It is a summer-weight quilt, and what little batting is in it has definitely shifted a bit, as you can see when it is held up to the light.


An unexpected surprise upon receiving the quilt, was the initials that were embroidered on the bottom.


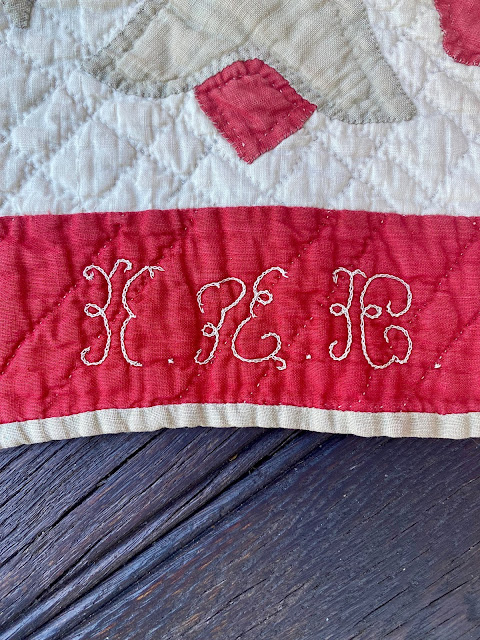
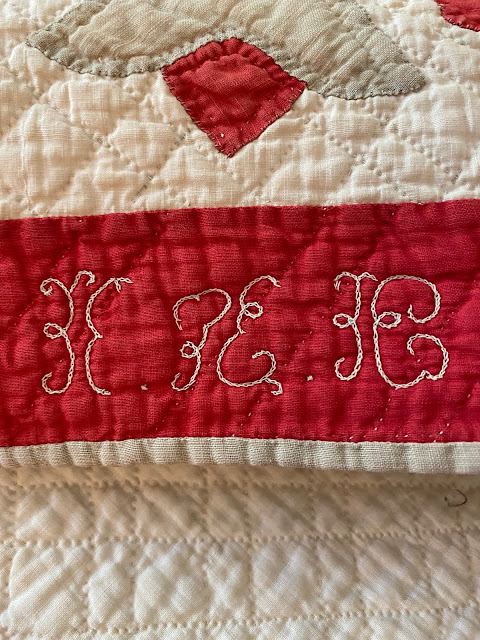
We have had an interesting time trying to interpret them, but the periods after each two initials lead us to believe that maybe it was three different makers. One thought is they were all sisters with the same initials but they all three had different ways of making those initials. Of course, that is just an assumption, and we will most likely never know the story behind this quilt.

So why purchase old quilts that have very little information attached to them and are in various states of disrepair? To me, each quilt I buy is a piece of a puzzle of what quilters of the past chose to create. Every quilt has something special that spoke to me and connected me to the original maker—whether it be the pattern, materials, or technique used. Do you have any old quilts that have spoken to you? We would love to hear about them!


Thursday, December 17, 2020

Vintage Re-done

As a result of having some extra time on my (Kara) hands thanks to the lockdowns, I decided I would make all three of our children quilts. I had intentions of doing that for them about 20 years ago, but only succeeded in making one child her own quilt (you can read about that HERE). The first two quilts had been finished and quilted and so I had one left to make. A long time ago, I purchased an old quilt top in a thrift store and I had yet to do anything with it. The top was probably from the 60's and was a color-filled amalgamation of scraps, with no apparent rhyme or reason as to the color placement. That didn't matter to our oldest as she has a love for all things vintage and this quilt top spoke to her.


Before I knew better, I washed the quilt top when I brought it home—big mistake. Some of the fabrics were not typical quilting cottons and a few of them frayed through the seams. When I decided to re-make this for my daughter, I knew that surgery would be involved and that not all the blocks would make it. What started out as a 30 block quilt, would have to be reduced to 20. In order to neaten things up a bit, I knew I would have to trim the blocks to a uniform size. The downside to that is that I would lose the points on the center square, but I just told myself that it would become a "snowball".

The aftermath of un-sewing
The trimmed blocks that made the cut.

The next decision to be made was what to do with the sashing. My hands had gotten sore from all the un-stitching, so taking apart all the cornerstones was not going to happen. Since the sashing had to be trimmed to the new block size, I didn't hesitate to cut out the cornerstones, but this meant I had to replace it with something. I remembered that I had a box of gingham that I received from my Grandma before she passed. Kaitlin, our daughter, was fortunate to know and love her Great-Grandma, so using this fabric added a special twist to this re-make.

The gingham cornerstones

I dug into the box of gingham again for the backing and there was a green and white piece that my grandmother had already sewn into a backing, so it was pretty apparent that it was meant to be the backing for this quilt. My long-arm friend Lisa and I decided on a great all-over leaf pattern for the quilt, and Lisa did a fantastic job completing the journey of this crazy, vintage quilt top!


This hot pink!
Gotta love a good paisley!

One of my favorite fabrics.


What was a discarded item, ended up being transformed into a unique beauty full of special details that will speak to the new owner. I don't know anything about the original maker, but I hope she would love to see what became of her quilt top.


Thursday, November 12, 2020

"It's Not Over 'Til the Fat Lady Binds"

 ...or sings. Or both—because when I finally bound this quilt, I sang!


This quilt was part of a mystery quilt that the guild I (Teri) belonged to was doing—about 15 or so years ago. There are many details about the project I don't remember, like who designed the pattern, but I can remember many things that I learned about myself doing this project.

First, I am not very good at mystery designing. I remember waiting a few months to get started so that I could see a bit of the design coming together before I chose my colors and fabrics. I had decided to do a scrappy quilt, using only fabrics from my stash. I succeeded in completing the quilt without buying any new material, but I learned something else about myself.

Primary block design
I enjoyed picking the reds and greens from my stash.

Second, I don't like random, scrappy sewing. I have to plan my random scrappiness. It took me so much longer to arrange the blocks because I didn't want the same fabrics to be adjacent, or even very close. I would put the blocks on the design wall and rearrange them repeatedly, and every time I thought I had gotten it, I'd see two identical reds, greens, or neutrals right next to each other. And when I moved one block, there would be a domino effect. Good thing I like puzzles. 

Secondary block design
I allowed myself a but more leniency with the neutrals. 

I remember that I had bought this paisley design in the border and the corresponding fabric that makes my star centers, so I wanted that to be the starting point of my color choices. The trick was to pull together the blue and yellow greens, as well as the orangey and bluish reds. I chose a few fabrics with both colors to help, and the overall effect seems to work. 

So third, I love color!

I made this quilt when I was a piecer, long before I was pulled to the fabulous world of slow stitching. This quilt was filled with points! I am not sure I'd have the patience for all that precision work today. I might have to hand-piece it!

I finished the top and sent it off to a long-arm quilter. Helping her design how to quilt it was fun. Then I got it back and put it on my to-do list. I even had the binding chosen and cut out. All I had to do was trim the quilt edges, sew on the binding, and stitch it down. But it moved from my sewing room in the basement to my new room upstairs, and finally, to my new home. How absurd is that? 

Fourth, I guess binding is not my favorite part of the process. And maybe I am a great procrastinator?

But at long last, I can sing. I have bound the quilt, and miraculously, I even still like it! 
I do love the scrappy look of this quilt, even if I know it was "plandom" and not random. Every time I look at this quilt, I see another design jumping out at me as these blocks interact. Hooray for a fun finish!

I have yet to determine where this now finished quilt will live. It does look happy on my couch, just waiting for an afternoon nap on a gray day. Maybe today.

The moral to this story: Don't wait 15 years to bind your almost-finished quilts. Just think of all the love this quilt could have given over the past decade and a half!


I'm sure you can imagine what my husband said when he walked in the room to see me perched on my tip-toes on a bar stool to take a picture of the quilt. I'm certain it was nicer than what he was thinking!

Thursday, April 9, 2020

Quaran"stitching" and other Stay at Home Activities

No matter where we are in the world, "Stay at Home" has become the new normal. Six months ago, we had no idea that this pandemic would change our lives so dramatically. Many of us are making the best of it, with activities that we might not have had time for before. Teri and I (Kara) thought we would share some of the things we are doing to stay at home and out of trouble.

My quilt guild, The Black Forest Quilters, began a mystery quilt a few months ago. I decided that I would take a break from hand-stitching and make friends with my machine again. I was a few clues behind, but was determined to finish. Mystery quilts are a little bit of a risk when you begin, because it is a lot of work for something you may not like but I trusted the organizer to pick a good pattern. I was very happy with the quilt, and it used up a lot of brights that I had languishing in my stash. Mysteries can be fun!

Charm Shuffle, by Gudrun Erla
Stripology Mixology

The finished quilt top

After vacationing at my machine, it was time to get to work on some upcoming deadlines. One of those deadlines was to get started on a new set of blocks for our Village Wanderings Series

Picking ribbon colors

It's always fun to create, and these blocks were no exception. I even decided to play around with some miniature elements for a few of them.

Prepped to be stitched down.
Ready to be appliquéd.


Another miniature for one of the blocks.

While we are working on new projects, we are continuing to make progress on our Woodland Reverie quilt. Teri and I each pick a block, finish it, and then the other person makes that block in her colorway. It is fun to see how the same block looks different with another background and appliqué palette.

My version

Teri's version

When I made it home from the US about three weeks ago, I had no idea that things would escalate as quickly as they did. I went to the grocery store, stocked up on some things, and began stitching. Who knew that my next stitching project would be masks to wear in public places here in Germany.

When this is over maybe these will work as a bikini top!
The first ones cut out and ready to stitch.

The internet is full of wonderful free patterns right now, and I found this one and fell in love with it. It is called Plaid-ish, by Kitchen Table Quilting. I have been wanting to organize and use my scraps, and this seemed like a good project to motivate me to do so.

Yikes!

Organized by color and value. Next step is to trim them into manageable pieces.

This quilt takes a lot of time to cut, but the sewing is simple.

That has been the stitching done over here on this side of the pond, but as much as I would like to stitch all day, other things must be done–like grocery shopping. My wonderful husband did most of the shopping while I was quarantined. I gave him a list but was not as specific as I should have been, so when I wrote "smoked sausage", this is what came home:

We  are now well-stocked with smoked sausage.
It was a great choice because the sausage is quite tasty!

My wonderful daughter-in-law inspired me to try my hand at sourdough bread. I have never been successful at creating a perfect loaf, so that was my quest. Two days after starting, I achieved sourdough nirvana (slight over-exaggeration).

It's not perfect, but I'll take it.

That has been what has going on over here. Teri will share her "quaranstitching" adventures with you next week. In the meantime, we are working on a special mystery project that we will be offering to you all in the coming weeks. 

Stay healthy, stay home, and stay stitching!

Thursday, January 23, 2020

A Prairie Update

As the new year has begun, so has the drive to complete some projects that we have on deck for this year. Teri wrote about hers a couple of weeks ago in her goals post seen HERE, and I (Kara) also have a few in-progress items that I have been working to get finished. As Teri mentioned in her post, I like to have projects as opposed to just blocks—not that there is anything wrong with having blocks. When we finished our Baltimore Fraktur blocks for our September 2020 class at Baltimore on the Prairie, I knew then that I would turn my block into a medallion quilt. Here is a little update on how that's going and what is to come.

The fraktur center is wool appliqué on linen, but I love mixing wool and cotton along with appliqué and piecing, so I knew that this quilt would be a mixture of all those things. The fabrics came to me by way of a former guild member who passed away. Her fabric collection was vast, and her husband offered the fabrics up to guild members with any monetary donations going to hospice. While I did not know Gabby, when I saw her fabric taste, I knew we were kindred spirits. She had a great collection of Dutch Heritage fabrics, and I knew they would be perfect for this quilt. 

Now that I had the fabrics and materials ready, it was time to get started. The first step was to frame the center with fabric and a contrasting bias strip.


I added a feather stitch to the bias using a #12 Painters Threads perle cotton.

Next was the piecing. Pinwheels seemed to me to be a good choice for a quilt that is reminiscent of the Pennsylvania Dutch. I've never been very fond of math, but it is a necessary evil for piecing—especially when trying to make the right size pinwheel and enough of them to fit around a square. I could say I did a lot of complicated math to figure out what size pinwheel and how many I needed to make, but that would be lying. I fit my medallion to the pinwheels by not trimming it until the blocks were finished—minimal math involved.

The grey will be a great canvas for some creative hand quilting.

A mix of Dutch Heritage fabrics and my stash.

The borders were next to be designed. Birds were definitely going to be part of this quilt (of course) and they would also be used for Teri's Baltimore Fraktur version, but I thought that it might be fun to do two different borders—one for the top and one for the sides. The top heart border is the first one that has been started and that is where the progress stands.

Ready to be stitched down and embellished.

A friend is going to help stitch all the wool down.
Love those Dutch Heritage fabrics

The two side borders have been cut, as well as the four corner blocks. I think these borders will come together quickly just like the medallion did. The medallion is not as complicated as it might look, and the ribbon work is not difficult either. If you join our class next September, you will see what I mean!

It is our plan to have our Baltimore Fraktur Quilt and wall hanging patterned up and ready to go for our students at Baltimore on the Prairie. Those who have signed up for our class there will receive the quilt and wallhanging patterns for free and then it will be sold on our website after we get back. In the meantime, we will keep you posted on the progress of this quilt and the wallhanging that Teri will be making. We are so excited about this project and can't wait to reveal the finished pieces!