Showing posts with label flannel. Show all posts

Thursday, November 19, 2020

All the Stockings Were Hung...

Both Teri and I (Kara) have been working on all things stocking lately. Our Cardinals Christmas Stocking was released earlier in the week, and now we would like to introduce our Floral Christmas Stocking!

This flannel and wool stocking is simple in its color scheme but is full of little details that give it a unique charm. All the simple embroidery is done with Weeks DyeWorks crewel wool, giving the stocking a lot of texture. We have a limited number of kits available that include the flannel, wool, ribbon hanger, and a whole skein of the Weeks crewel wool. All you need to provide is the lining.

I did this stocking a little differently than our Cottage Christmas stocking. Instead of cutting out the stocking pieces first and then appliquéing, I lightly traced the stocking pattern outline on my flannel so I knew where to place my appliqués and then proceeded to stitch them down. This way I didn't have to worry about distortion from the appliqués or fraying on the cut edges.

...and traced.
Pattern is pinned...


All the embroidery stitches are pretty standard, with the exception of the Pekinese stitch. It is a simple stitch that we love to use since the effect it gives is so varied depending on the thread you use. You can watch a tutorial for the Pekinese stitch HERE

Back stitch
Pekinese


Seed stitch and French knots

Stem stitch, lazy daisies, and knots
Fly stitches

Blanket stitch

When you are finished appliquéing your stocking, line up your appliquéd piece and your backing fabric, wrong sides together, and cut it out using your traced line as a guide. Be sure to leave a 1/4 inch seam allowance all the way around when you cut both pieces out. Do the same with your lining fabric.


To see the method we used to assemble our stocking, please go to our Cottage Christmas Stocking post HERE. We have used this method for all our stockings and find that it works out well in putting the stocking together.

The stocking pattern is available for digital download on our website, and we will have printed patterns available for it in the near future. The full kit—with wool, flannel, ribbon hanger, and thread—is also available on the website, although we have just 20 kits available. It's possible we may be able to stock more, but not promised.


Our good friend, Linda Macklin, suggested that we have a stocking of the year (Thanks Linda!) Two years ago, we offered our Cottage Christmas Stocking and Teri had the Cardinals Christmas Stocking all cut out last year, so we will count that as our 2019 stocking. With this stocking, I'd say we are well our way with a yearly stocking tradition! 

We hope you enjoy stitching our Floral Christmas Stocking and that it brings a little joy to you during this crazy year.


Saturday, December 31, 2016

A Magical Year

Once upon a time, there were two friends who loved to stitch—so much so that we decided to join together and become a team, calling our business Through the Needle's Eye. We began designing and creating a fairy tale quilt, started teaching and lecturing, and began our blog.

In 2016, our fairy tale stitching included some fantastic experiences.


We designed several patterns in wool, having started with our ornaments last year. In fact, our first wool appliqué pattern, Marcia's Flowers, is available on our website, as well as at two local shops! Another pattern set is in the planning stages.


We taught a six-month crazy quilting class, including instruction on constructing the blocks, choosing and stitching motif designs, embellishing stitches with ribbon and beads, combination seam stitches, and finishing the project. We learned as much as our students in those creative classes!


We completed our Fairy Tale Album, which was accepted into a special exhibit at the International Quilt Festival in Houston in November, and it will also be included in the show in Chicago in the spring. It was such fun to see it there, especially seeing people study it to discover many of the stitched details.


A new granddaughter calls for a baby blanket, and what better design for a baby named Ella than to blow up the size of our Cinderella block pattern and work it in flannel? A few embroidered dimensional touches were her immediate favorite parts.


Among the many new projects in the works is a redwork quilt—using fairy tale motifs, of course! We were honored to be invited to teach at the Academy of Appliqué in Williamsburg in 2017 and have been busy preparing for that. So many ideas; so much stitching!

Tonight, we celebrate the end of a wonderful 2016 in great anticipation of the year to come, which promises many exciting opportunities, both in our stitching and our personal lives. We can't wait to see how it all unfolds. 

So when the clock strikes midnight tonight, we won't worry that our carriage will become just a pumpkin. No, we will cling to our glass slippers and the sparkling promises they hold for the coming year—the next chapter in our happily ever after!

May you have a happy and prosperous 2017! 

Thursday, September 8, 2016

In the Beginning

I (Teri) never know where my inspiration for a blog post may be found. This post comes from an unlikely source: my visit to the dentist last week. While I was making my next appointment, I ran into an old friend, who works in the office. We chatted for a minute, and as I left, I realized what a huge impact she had had on my life. (I hope you are reading this, Jan!)

Twenty years ago, I had just purchased my first sewing machine. Other than in home economics class, I had never done much sewing. But I had a yearning to make a quilt, so I bought a machine. A couple of years later, the above-mentioned friend, Jan, said she would teach a few of us that worked at the school where I taught how to make a Quilt in a Day, a log cabin pattern by Eleanor Burns. I was naive enough to think it would really take me only a day, and I was quite excited. 

My first quilt, 1999
I had crocheted afghans for each of my three children, and I was planning to try to make quilts for my two soon-to-be step-daughters. I went to Jo-Ann's and chose some fabric that I thought went together. I had no knowledge of the pattern, of light and dark values of colors, or of design. I just picked material. Jan taught us how to use the rotary cutter, strip-piece, sew a 1/4" seam, and press the seams to the darker fabric. I think I got two blocks finished that day, and it took me a few months to finish the quilt, but I had learned the basic skills required to get me started. I stitched around the quilt, turned it, and tied it. And then I made another one, with lights on one side and darks on the other—a more traditional log cabin. (That one is packed away in the midst of a move, so I don't have a photo of it.)

Truth be told, when I look at this quilt, I'm tempted to see everything I would do differently today. But I force myself to look at it as a learning experience, for every stitch taught me something and started me on my journey of loving the art of quilts. And this quilt has wrapped love around my step-daughter for years.

Several years later, my daughter was about to graduate from high school. I had come across a piece of flannel that her late grandmother had purchased many years ago, probably to make a nightgown. I thought it would be nice to make a quilt using that piece of fabric, to include this grandma that my daughter had never had the chance to meet. Her favorite color was yellow, so I knew I needed to incorporate that color into the quilt, and since it was flannel, I thought I would try a rag quilt. This picture is old and poor quality, but it gives you the idea.
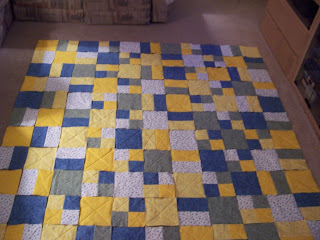
Arranging the blocks on the floor for placement before sewing them together.
The white print was the flannel from her grandmother.

A few months ago, I asked my daughter to send me a photo of her quilt, and she promptly replied with this photo. As I remember, it was a snowy day, and she was working from home. How nice to know that she stills sleeps—and sometimes works—under this quilt.


Soon after my older son went into the Air Force, I asked him what kind of quilt he wanted me to make for him. He chose a Disappearing Nine Patch, but he wanted it to have fish, not flowers. Knowing that I needed to make a masculine quilt, I found a couple of fish prints that both had brown, so they got me started. I also used a Civil War print, because he likes history. When I visit him in Alaska, I sleep under that quilt, which covers the bed in their guest room.

The fish prints are the dark outer border, and the lighter center print. Here it is before quilting.

This quilt has traveled to Texas, New Jersey, Turkey, Japan, and Alaska!

When my younger son reminded me that he was the only one who hadn't yet gotten a quilt, I was surprised that he wanted the same type of quilt as his sister—a flannel rag quilt. He was a die-hard Dallas Cowboys fan, so he wanted it to be blue and gray, which are that football team's colors. Collecting a variety of blues and grays was a bit of an adventure. Those quilts are easy and fast to make, so I knew I could finish it for him quickly, but my hand wasn't looking forward to all that snipping of the seam allowances. 

When I finished this quilt, I would have completed quilts for all of my children. 

Grandson jumping on the bed in their guest room 

As I made that first quilt so many years ago, as well as the other quilts for my children, I would never have imagined where my quilting journey would take me. When I left the dentist's office last week, I realized how much I appreciated Jan sharing her talents with us that day. I remembered her showing us some of the projects she had stitched; I sat there thinking that I could never do that kind of work. But I was wrong. I had to take the time to learn many skills along the way, as well as to learn how to take risks and try newer, more difficult things. While I have grown to love the more intricate work of appliqué, embellished with embroidery, I still love the quilts that I've stitched for family and friends that were made to keep them warm. And I'm so grateful to the many people who have taught and inspired me along the way.  And it has been my honor to share that passion with others, as well!

Teaching a friend's daughter her first lesson in designing and hand-piecing a doll quilt


Thursday, July 28, 2016

Ella's Cinderella

I (Teri) have written several posts about my grandchildren's quilts. Both of my grandsons, who are about six weeks apart, got Cat in the Hat quilts. [See Thing 1 and Thing 2 and The Cat in the Hat Comes Back.] Unfortunately, my boys didn't get their quilts until their first and second birthdays. I was determined that my granddaughter, Ella, would actually get a baby quilt. I was planning even before she was born and looked to many sources for inspiration. [See Inspiration for a Baby Quilt.] Finally, having completed our Fairy Tale Album, I thought that there could be not a better quilt for Ella than Cinderella

A baby blanket should be soft and cuddly, so I decided to use flannel for the appliqué. Off to the quilt shop I went to do my favorite part of the quilt process: choosing my fabrics. Although I was a bit more limited in my choices, since there is not nearly the selection of flannels as cottons, I was able to find everything I needed in one stop. It probably helped that I shopped in the fall, and I was stitching a pumpkin. That, and I love the whole autumnal palette, so it worked out perfectly.

Kara's Cinderella block from
our Fairy Tale Album
When Kara and I made our Fairy Tale Album, we divided up the blocks and each stitched different ones. Somehow, although Cinderella has always been one of my favorite fairy tales, Kara ended up stitching that one. I knew that block would be in my future, so this was the perfect opportunity for me to appliqué our design. I went to the copy shop and had the 12.5-inch block design enlarged to a 20-inch design area.

To do the vine, Kara used bias strips of the greens and wove them as she stitched. Because my design area was so large, I would have needed more than a yard of each of my vine fabrics to use bias strips. So to save money—flannel being more costly than cotton—I decided to do one section at a time. That ended up being quite the challenge, as I had to determine just what overlapped where to figure out which sections to stitch in what order. Good thing I've always liked to solve puzzles and brain teasers! I would definitely just buy the extra fabric and weave bias strips if I ever stitch this again.

Ella's Cinderella block in flannel, a 20" design centered on a 32"x38" baby blanket.

Stitching this was great fun, and quite a different kind of appliqué experience. Such large units were both easier and more challenging at the same time: gentler curves and more straight lines to stitch, yet there was so much more bulk to handle, especially when appliquéing the center of the block. But flannel is a dream to appliqué! If you've never tried it, I encourage you to do so. I expected the fabric to fray, but it didn't at all, and it turned under so nicely. 

Technically, this is not really a quilt, because while it does have three layers—a piece of flannel in the middle for the "batting"—I chose not to quilt it, because my experience is that the flannel stays together nicely, even through washings. (I've made quite a few flannel baby blankets.) I toyed with the idea of using a sashiko-style quilting around the appliqué, but ultimately, I was afraid it might detract from the design. I am planning to stitch her name beneath the design before I officially give it to her, however.

Here are a few details of her blanket.

Pumpkin turned carriage

Cinderella's glass slipper
I had to pad the light blue so that the leaves and flowers would not show.
It gave the slipper a bit of dimension as well.

The magic wand

A wee mouse, before transforming to a horse

The bow on the slipper: carefully and securely stitched with beads;
and the center of the pumpkin flower: knots surrounded by bullion stitches 


Ella loved exploring her new baby blanket! She especially loved the shoe and the flowers.

And she got it before her birthday!!


Wednesday, June 22, 2016

The Crazy Quilt Wrap-Up


A journey we started six months ago came to an end last Saturday. We had the last class in our Crazy Quilt: Start to Finish series, and it did not disappoint. You can read about our students' progress over the last six months through the following links:

Crazy Quilting—Start to Finish
Crazy Quilting—Start to Finish; Session One: Constructing the Blocks
Crazy Quilts, Session 2: Marking and Stitching Motifs
Crazy Quilts, Session 3: Ribbon Fun
Crazy Quilts, Sessions 4 and 5: Progress

Every student had a different take on what they wanted their project to look like. Whether it was the fabric choices, colors, or motifs, all of the projects displayed the unique stamp and personality of their creators.


Joanne displaying her progress

Inspiration taken from Joanne's love of birds

Linda sharing her inspiration

Each of these blocks had a theme

The stitcher's birthplace

This is a block all about the creator; her love of cats, hats, and roses

What sweet ribbon roses made by Theresa, an avid gardener and flower arranger

Some of our ladies chose to stick with four blocks, while others had more ambitious plans—and one is preparing to do 42 blocks for a large crazy quilt!

Denise chose these lovely earth tones 
and is considering framing her four blocks

Betsy has nine wonderful blocks made with her stash

Laurel has already put together 12 of her 42 blocks and chose
black centers to be the common thread in each block.

Our Wednesday students completed their four block projects and definitely fulfilled the "start to finish" aspect of our class.

Norma's completed project contains some of her beautiful hardanger work.

Rebecca's gorgeous fairy tale crazy quilt, complete with border and binding


A beautiful variegated ribbon flower in the border

As one final lesson, we did a combination stitch, round-robin activity in class. A 7x5" piece of flannel-backed linen with two drawn lines was given to all, and we each had to stitch a "seam" stitch.

Our round-robin pieces
Then we passed our fabric to the next person and they put another stitch down to combine with the first one. We passed it two more times so that each piece had been stitched by four different hands. The goal of the activity was to help our students with the combination-stitch thought process. Folded in half, these would make simple needle book covers if left as is, or they could be embellished a bit with more combination stitches or even a few small motifs. 

A good practice for all the stitches learned

We have had an amazing journey with our students and have loved getting to know them and helping them bring out their crazy quilt creative side. Both Teri and I have been thrilled to share our love of crazy quilting and embroidery, not just with our students in class, but with you, our readers, as well.