Thursday, May 6, 2021

"In the Garden" Again: Violets


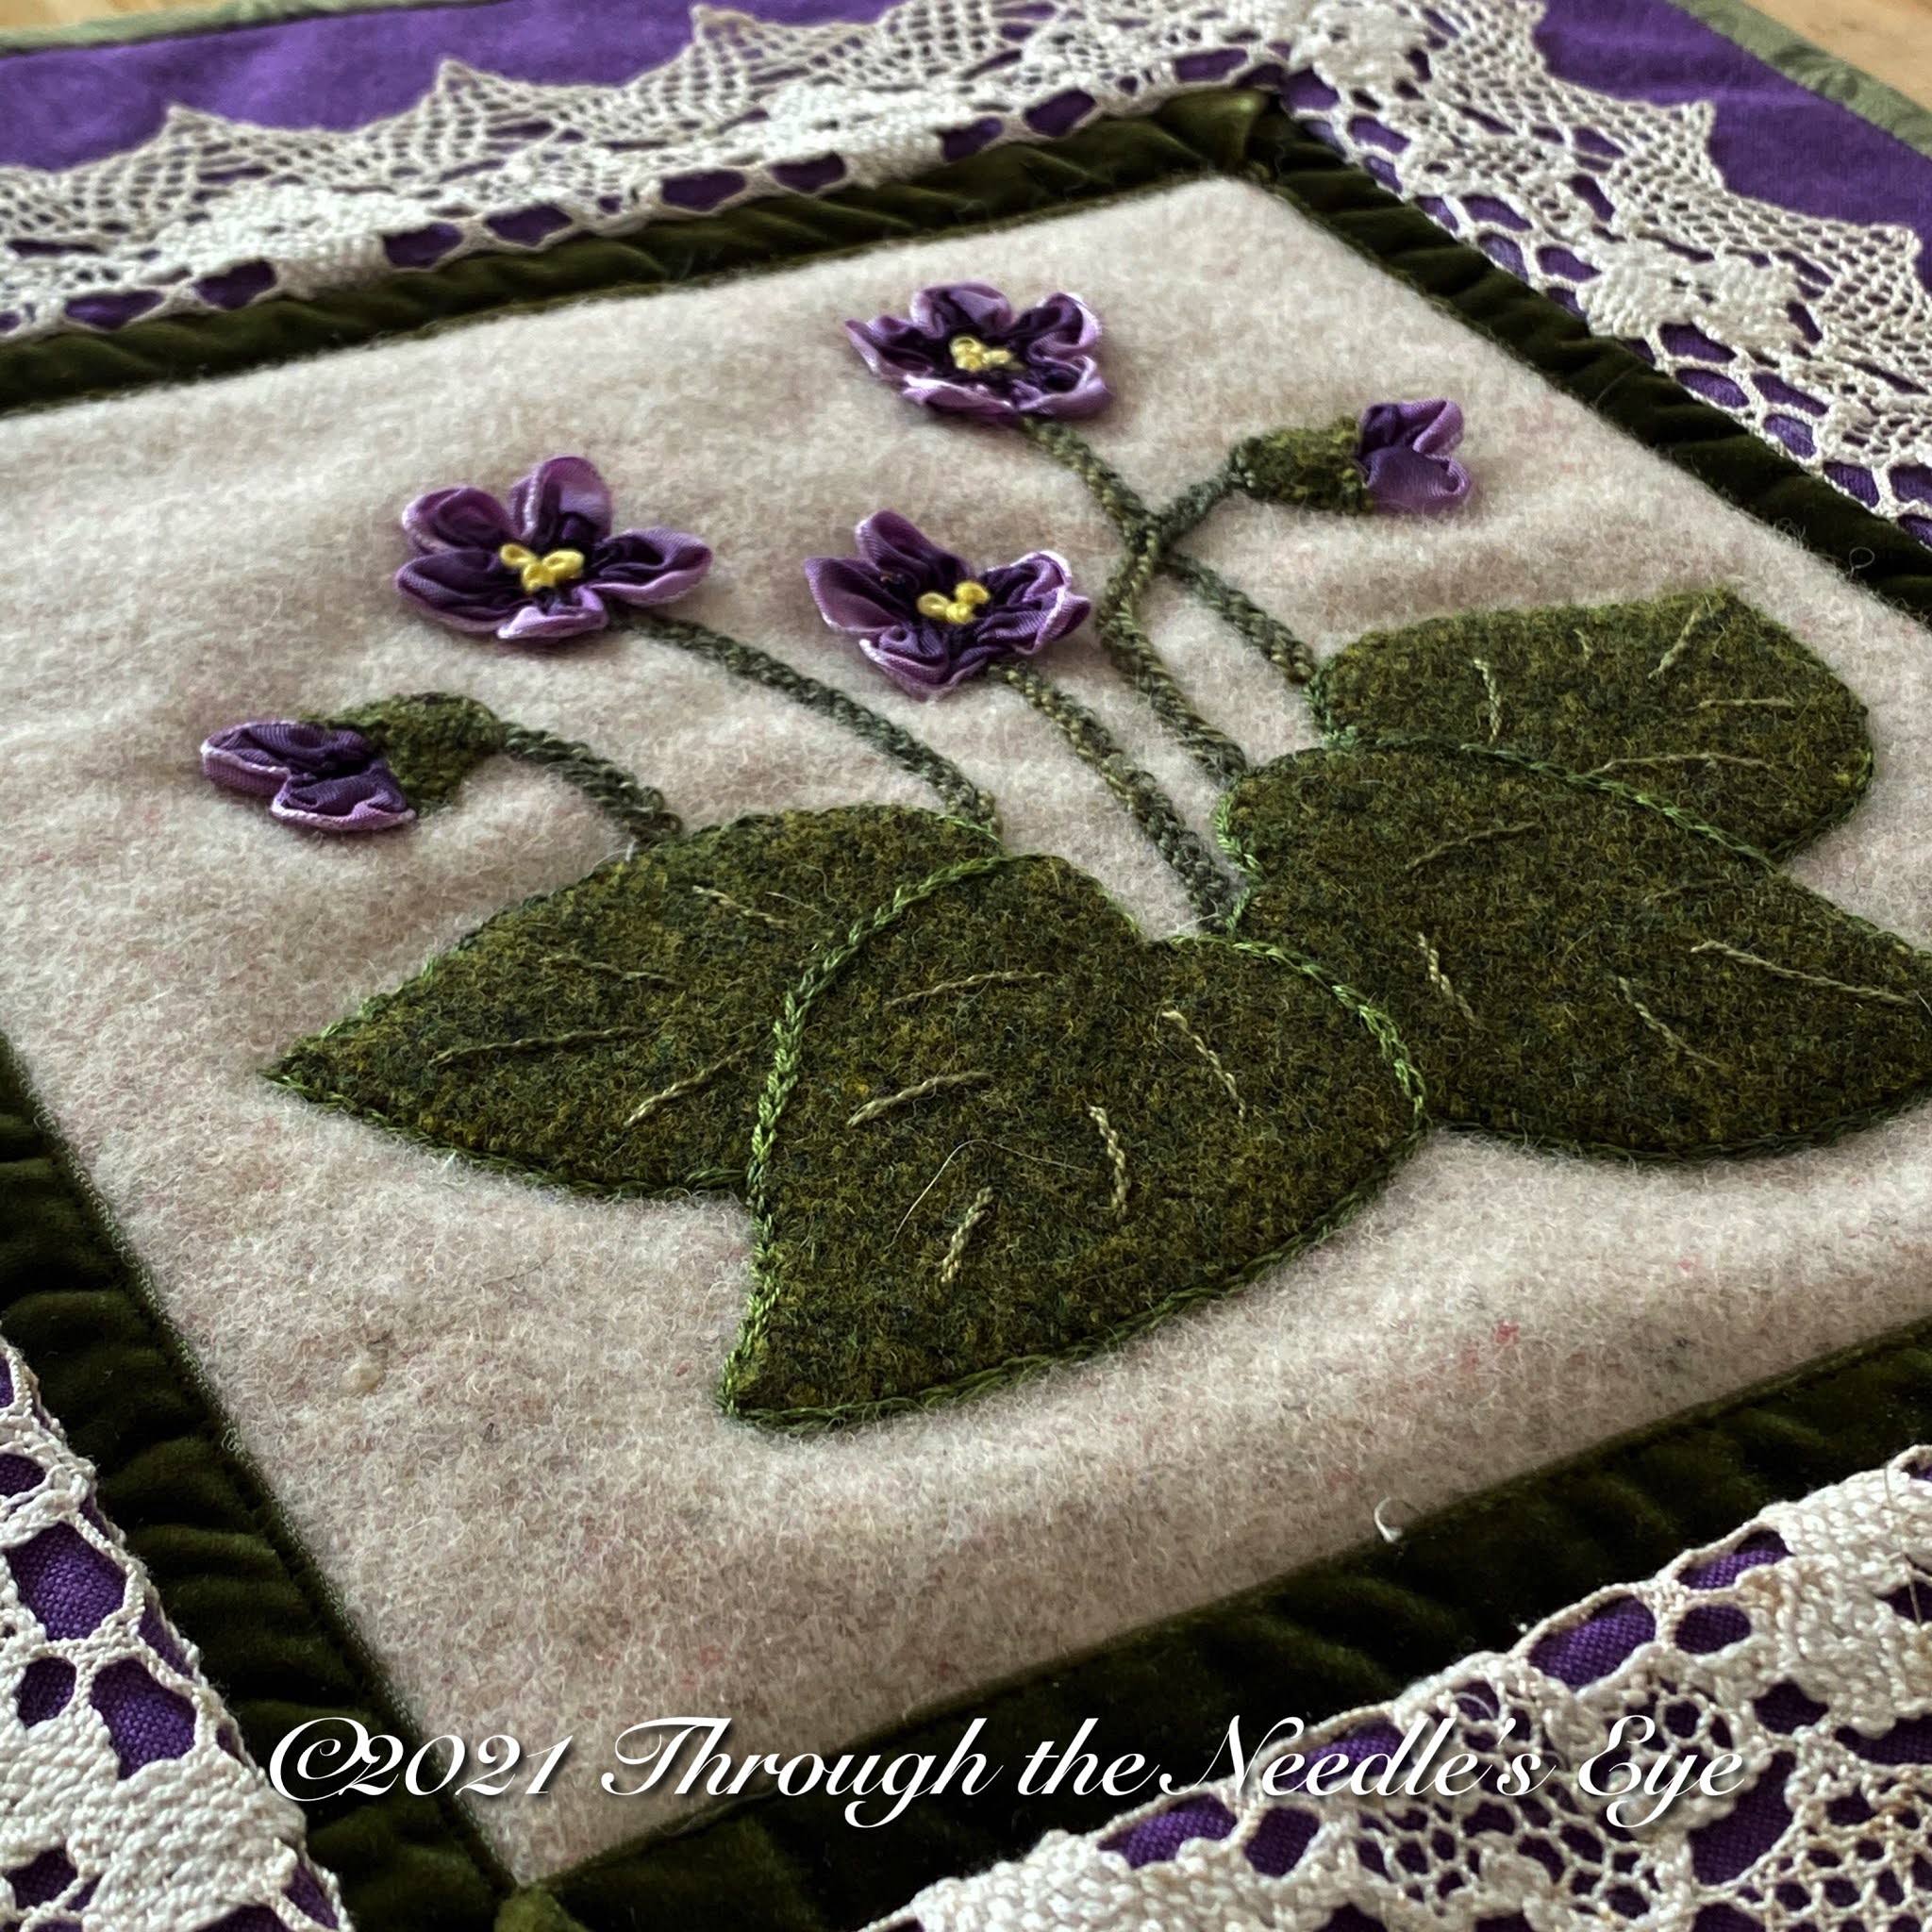
This week we present one of my (Kara) favorite In the Garden patterns—Violets. This pattern started out in a different format, but we knew it would be perfect for this series. It is the first pattern that uses French ombre wired ribbon and we think you will love it if you haven't worked with it before. Embroidery stitches play a big part in creating the wonderful dimension of the leaves and stems. A simple chain stitch defines the leaves and one of our favorite stitches, the Pekinese, creates the stems. You can make this for your In the Garden quilt or you can turn it into a sweet wallhanging (You can read how we created our wallhanging HERE.) You may want to make both!


💐💐💐💐💐💐💐💐💐💐

Until May 12th, use the coupon code VIOLETS10 to receive 10% off your Violets pattern purchase!

Thursday, December 14, 2017

"In the Garden"—Violets

Roses are red, 
Violets are blue.
God can make violets,
But so can YOU! 

At least you can, if you use ribbon! This month's Block of the Month in our In the Garden series will have you creating lovely violets out of wired ribbon. Are you ready? Here we go! I (Teri) will give you a quick pictorial tour of the methods used to create these life-like blooms, and  then you will be ready to start "planting." In our class this past weekend, I heard several "I can't make that" comments become "Wow! I CAN make this flower!"

December BOM: Violets


The Leaves
I cut the leaves out as one unit and delineated them with embroidery.
You could, if you prefer, cut them and appliqué them as separate units.
I staple them in place, and then carefully remove the staples after appliquéing. 


I used a Bohin chalk pencil to mark the lines between the leaves,
The chalk shows up easily on the wool, and doesn't last.


A chain stitch with two strands of floss outlines the individual leaves. On the edges, I took the needle from the background a tiny bit into the edge of the leaf, so that the chain "hugged" the raw edge.


To make the two center leaves pop and appear closer, I used a lighter wool thread to do a chain stitch on top of the
darker green floss chain stitch. Because the wool thread was a bit thinner, it nestled inside the previous chain.
Veins are then added using a stem stitch; I used size 12 pearl cotton.


The Flowers
Cut a piece of wired ribbon 5 1/2 inches long. Starting 1/4 inch from the edge,
mark lines on the ribbon at 1-inch intervals.


Along the first line, start at the bottom and do a running stitch by the line, and
across the top, just under the wire. Use a thick or doubled thread for gathering. 


When you reach the next marked line, stitch down one side and up the other. Be sure that your thread overlaps the edge of the ribbon. Gather to create your first petal.


Continue to do a running stitch and gather after each petal.


After gathering all five petals, knot the thread but leave the needle and thread in place.


Manipulate the petals into a flower shape, using the wires to shape the petals.


Use your needle as a tool to pull the center of the petals together.
Take some large stitches to secure the flower center.


Don't worry if it doesn't look perfect; the center knots will be added later.


Use tack stitches to secure the blooms to the background, stitching in the gathers of the
flowers with matching thread. The buds are created with two "petals" rather than five.


The Stems


A pekinese stitch was used to create the stems. I used a size 5 pearl cotton
to make a nice thick stem. First, mark the stem lines and do a back stitch. 


The thread is then woven on top of the piece through the backstitches. For a great tutorial of the pekinese stitch, click here.


We are having such fun creating these designs, and we hope you will join us on our BOM gardening journey. All patterns are available in our website store (https://www.needleseyestories.com/shop), and the ribbon is included with the pattern for those with ribbon blooms. Both digital and hard copy patterns are available, although to get the ribbon, you need to order a hard copy. (Like you couldn't guess that we wouldn't send you digital ribbon!) 😄

Happy stitching—let's make some violets!!


To read about the other blocks in our In the Garden series, click on the links below.


Thursday, April 29, 2021

"In the Garden" Again: Oak Leaves and Acorns


It is hard to think of autumn as we are enjoying the glory of spring, but this week's In the Garden block will help you to be ready when the leaves that are now just coming out, will start changing their colors. This block will give you some wonderful practice with French knots—note Teri's trick with a pillow to aid in making the multitude of knots. Here is the unedited version of our previous blog post to help you as you stitch this little bit of autumn!


Until May 5th, use the coupon code ACORNS10 to receive a 10% discount on the printed pattern!

🍁🍁🍁🍁🍁🍁🍁🍁🍁🍁🍁

Thursday, November 16, 2017

I (Teri) was afraid that the only autumnal color we were going to get this year would be that which I stitched. Here in Maryland, the days stayed warm and the temperatures didn't drop as much at night much later than normal, resulting in an October of primarily green trees. In the past few weeks, we have finally been seeing some color, though it was sadly short-lived, as many of the leaves have already begun falling.

While I love green, the autumn palette is my favorite, so it was with great pleasure that I stitched this month's block in our In the Garden Block of the Month series, Oak Leaves and Acorns. If you missed our first block, it is available on our website. You can read about Cornflowers by clicking here.

November block: Oak Leaves and Acorns


Our BOM class was held at Primitive Homespuns Wool & Needleworks on Sunday afternoon. We had a delightful time—lots of stitching and lots of laughing. As you can see in the photograph, there were moments of nearly silent concentration, with only the sound of needles pulling thread through our wool. And then the conversation would begin, as we got to know new stitching friends. This quaint shop offers such a charming setting for our classes!
We began by stapling our leaves and stem in place onto the background. Around each leaf, we blanket stitched with The Gentle Art Simply Wool™ thread, which blended into the wool beautifully, giving the leaves a crisp edge. Variegated Valdani Pearl Cotton 12 gave the veins a bit of pop and sheen.


I have been intrigued by the new Rustic Wool Moire™100% wool threads. I had bought several spools but hadn't tried them yet. The branch seemed to be the perfect opportunity, as I had a color that blended with the wool I used precisely. It was a little fussy to work with, needing gentle handling and a short stitching piece, but I loved the way it worked with the wool. The natural slubs in the thread give the branch a little texture, but it sinks right into the the wool fabric. I didn't, however, choose the wool for the acorn caps. 


To make the acorns, I cut out a piece of gold the shape of the entire acorn. I blanket stitched around about 3/4 of the acorn, and then I stuffed it with polyester fluff. You could as easily use batting scraps or shredded scraps of wool for stuffing. Then I finished blanket stitching the acorn. For the cap, I choose Weeks Dye Works™ Pearl Cotton 8, but you could use size 5 if you want bigger and fewer knots. I first outlined the cap with knots and then filled it in—with hundreds of knots. I use a pillow when I do knots, so that after I wrap the thread around the needle, I can stick it straight into the pillow, and pull the wraps tautly, as in the photo above. I then pick up my work, holding the thread at the base of the knot with my thumb, and I gently pull the needle through from the back, keeping my thumb at the knot. Easy, uniform knots!

So many knots! You can use French or Colonial knots.

Pick a great movie or TV show to binge-watch, and knot away! They give such a realistic textured effect to the acorn caps.


I also met with the Margaret Potts quilt BOM group this past weekend. We are embellishing the blocks with ribbon and embroidery. To read about the ribbon flowers we learned last month, read the post "Potts" of Ribbon Flowers. Several people brought their blocks in to share what they had accomplished thus far. We had some lovely and creative flower centers! Not only are the flowers centers different, but each block has a different kind of veins in the leaf. It is such fun to see the modifications that are made to reflect the makers' own tastes and styles. 

A circle of knots and one of seed beads

Filled with knots to complement the color of the vase

A mixture of French and bullion knots

This month, we used River Silks ribbon to embellish our flowers, playing with several stitches—a straight stitch and the ribbon stitch. The buds were made with folded wired ribbon, and the thorny stem was created using the wheat ear stitch. I can't wait to see how these flowers look on all the blocks next month! 


What a fun-filled, stitching weekend! The only thing that could be more fun than two stitching classes would be to end the weekend with a birthday party for a two-year-old princess. Which I did! I know this grandma is a bit biased, but I think she is a darling little princess!

Admiring herself in her princess gown 

But I digress! If you haven't ordered your Cornflowers pattern, they are available on our website (click here). And our new pattern, Oak Leaves and Acorns is now available as well! We'd love to have you join us In the Garden!


Thursday, April 22, 2021

We're Back "In the Garden" Again: Cornflowers

As Kara stated last week, we will be revisiting our time capsule of posts from a few years ago, and going back In the Garden. We will be using many of the stitches we learned in our Hopeful Flowers Stitch Along, and sharing tips in our Hopeful Stitchers Facebook group. Since this post was first published, the quilt has been assembled, quilted, bound, and taught in two year-long BOMs at Primitive Homespuns. We hope that you will enjoy our return visit In the Garden, and if you have already stitched some of the blocks, perhaps you might share some of your successes in our Facebook group. Below, you can find the unedited original post from 2017. All of the patterns are available as digital downloaded PDFs or as printed copies with ribbon at needleseyestories.com. Enjoy!!


For this week only, use the coupon code CORNFLOWER10 to receive a 10% discount on the printed pattern with ribbon!

🌱🌱🌱🌱🌱🌱🌱🌱🌱🌱🌱🌱🌱🌱🌱


Thursday, October 19, 2017

Introducing "In the Garden," A BOM Series: Cornflowers

For some time now, Kara and I (Teri) have wanted to design a Block of the Month series. We discussed a number of different themes, but we finally settled on a garden. Before Kara left for Germany, we mapped out our plan, and worked with Kathy Makers of Primitive Homespuns Wool & Needleworks to select our palette of wools for the project. We love to mix different materials, so we will be combining wool, a variety of threads, ribbon, and even some beads. The blocks will vary in size, and ultimately, we plan to create a quilt out of the blocks. But you might wish to used the blocks independently in some other way—your creativity should know no bounds!

I will be introducing a new pattern each month in a class I'll teach at Kathy's shop in Frederick, Maryland. After the class, I will blog about it, and the pattern will be released on our website, needleseyestories.com. Any ribbon needed to complete the block will be included with the pattern. Of course, if you want to source your own ribbon, you can simply purchase the digital version of the pattern. If you are interested in purchasing wool and thread kits, you can do so through the Primitive Homespuns website, linked above.

The first block: Cornflowers (or Bachelor Buttons)

The Cornflowers class was held this past Sunday. Our first step was to appliqué down the wool unit for the leaves. Most of us did the leaves as one whole unit and used the embroidery to delineate the separate leaves. A couple people cut the leaves into separate units and appliquéd them down. Either method worked just fine. We worked on outlining the leaves with a stem stitch using Valdani pearl cotton, stitching fairly densely.


We all enjoyed making the bias silk cornflower blooms. The flowers are made with 1.5-inch Hanah bias silk ribbon, which is frayed, folded and gathered. 

Here is a brief tutorial for how to make these flowers. You will need to make two flowers.

Cut a 9-inch piece of ribbon. Fray the edges of both sides
of the ribbon with your thumbnail and index finger.

Fold the ribbon in half lengthwise. We didn't press it,
but a few ladies in class said that they would, because the silk is slippery.

Bring the two ends together. Starting at the fringy edge, backstitch
the two ends of the ribbon together with matching or neutral thread.
You should now have a loop.

Open the loop and take running stitches along the folded edge until you
get back to where you started. Your stitches need not be tiny;
ours were anywhere between an eighth and a quarter inch. 

Don't knot off the thread yet!
Pull the thread gently to gather and take two small backstitches
in the folds to secure the gathers.

The budding bloom on the right of the block is made the same way, with two exceptions. You start with a 4.5-inch piece of ribbon, and rather than opening the loop, you just stitch straight across through all the layers on the fold and gather. We started the class with a fun technique—what is more fun than the magic of turning a piece of ribbon into a beautiful flower? We set our blooms aside to create stems.

Our next task was to tackle the Hungarian Braided Chain stitch, used for the stems. I love this stitch, but it can take a while to feel comfortable with it. Some of us were wishing we had saved the ribbon fraying for after this stitch, so we could fray our stress out! We all agreed that we would master that stitch, but maybe not in one day. ☺

When I do this stitch, I am reminded of French braiding my daughter's hair. I would get the parts of the braid in place and then tug to secure it. As I stitch, I can almost hear her squealing. (Believe it or not, my adult daughter loves braiding her hair now; she might be gentler on herself than I was.) 

Here are a few photos of my method to help you out. For a really wonderful tutorial, check out Mary Corbet's video by clicking here. (And please don't compare my method with hers!)

1)  Start by making a lazy daisy stitch. Bring your needle up to the front a stitch-length away from the bottom of the lazy daisy.  Carefully take the needle through the tack stitch on the opposite side of the stitch.

2)  Pull the thread through the tack stitch, but do not pull tightly, yet. Take the needle to the back of the work precisely where the thread came to the front. Bring the needle back to the front a stitch-length below.

3)  Using the eye of the needle, so you won't pierce other threads, take your working thread under the stitch in the
middle of the loose stitch.  So your needle is over the outside stitch and under the previous stitch in the middle.
Keep the needle in place for the time being.

4)  This is where I give the working thread beneath a little tug. (Imagine a squealing little girl.)
Pull the needle through, eye first, but don't pull the thread tautly yet.
Repeat steps 2 through 4 until you have created the length of stem you desire. 

Because I was using size 12 pearl, I decided that the taller stems were too skinny for the big flowers, so I stitched another row right next to the first. It gave the stems a cool texture. But of course, you could always swap out a size 5 or 8 pearl if you wished. Or, as always, you might just want to sub in a totally different stitch! And that's okay.


To create the buds, I first appliquéd a piece of green wool in the shape of my bud. This gives the bud dimension, and it insures that if any color shines through the stitches, it is not the cream of my background. I used a periwinkle satin stitch to cover the point, and then I created random, overlapping fly stitches, shaped like a V, pointing to the tip of the bud—first in purple, and then green at the bottom. 

Now we just need to place our flowers and work the centers. To stitch the blooms in place, take some tack stitches into the folds of the blooms. I only stitched in the center, so that the petals would still move freely—like they're blowin' in the wind. In the center, I stitched French knots, using periwinkle floss with three wraps. I surrounded the center with a circle of purple French knots. Finally, I used black floss to make pistil stitches, radiating from the center, adding a bead to the knot. The beads, of course,  are optional. 


We are having a great time designing this quilt, and would love to have you join us! We have twelve garden-themed blocks coming, and ultimately, a border and plan for assembling them. Won't it be fun to garden all year long? We would love to have you join us—In the Garden!