Thursday, May 28, 2020

Going Around in Circles

Last week, Kara share a tutorial for appliquéing tiny circles. It seems that we appliqué artists never run out of circles to stitch in our designs, so I (Teri) thought we might look at a few other methods, and focus on one of my favorites.

Circles, like the soul, are neverending and turn round and round without a stop. ~Ralph Waldo Emerson


As Kara noted last week, when we taught this first class a few years ago, this block (an Elly Sienkiewicz design) needed some small berries. In my version of the block, I made the berries in three different ways, so that I could vary the texture—and of course, demonstrate three techniques for making small circles. 

A circle is a round straight line with a hole in the middle. ~Mark Twain 

There was panic on a couple of faces when seeing how small those berries are. Why do we fear the circle? We need not—there are so many ways to approach a circle, and with all the choices, you are sure to find one that you love. And some ways are just so easy! So let's add to our circular toolbox. 

Three ways to make these tiny berries.

By far, the easiest method is to use ultra suede. You don't need to turn under the edge, and it is easy to cut to any size. I've even used it for a tiny bird's beak. A thin, sharp needle sews through it with no problem. Easy as pie; nothing to fear. 

The very bottom berry in the photo above is made of a group of Colonial knots, or you could use French knots. It gives a raspberry effect. Also simple, and it gives an interested added texture to your piece. Variegated thread, like the Valdani I used here, also adds a spark.

A circle is the longest distance to same point. ~Tom Stoppard 

Let me tell you about my favorite circle. 

The Spiral Trellis 
A Tutorial 

1. Draw your circles onto your background. Backstitch around the circle, directly on the drawn line, in a counterclockwise direction. Here, I've used #12 Valdani pearl cotton, but you can try it with many different kinds of threads for various effects. 

2. When the circle is closed, put your needle under the next stitch to the left, about halfway. At this point, you may want to switch to a tapestry needle or use the eye, so you do not have a sharp tip piercing the thread. All of your work will now be on top of the ground fabric. 

3. Wrap the thread around the needle from the front around to the back in a clockwise direction. Pull the wrap taut. 

4. Holding the thread in place, pull the needle through, forming a knot. Repeat in each stitch, moving counterclockwise around the circle. 


5. When you have gone around the circle in all the backstitches, you will continue by putting your needle in between the stitches, wrapping and knotting as before. This is the only tricky part; at first you almost have to “feel it,” but with each round it gets easier to see where your needle should go. Don’t give up! It’s worth it! 

6. When your berry is close to being filled, skip to every other stitch.

7. For your last stitch, pull the needle into the stitch, through to the back and knot off.

Aren't those spirals pretty? 

Over the years, I have grown to love this special stitch. It just adds such fun texture and even a bit of dimension to my work. Here are a few ways I have used this gem of a stitch. 

On my redwork fairy tale quilt—a near-future post—my crown needed jewels, and the spiral trellis was perfect for a butterfly head. Here, I used two strands of The Gentle Art floss. 

Family Tree House pattern from Baltimore Elegance, by Elly Sienkiewicz. 


Here, I used Wonderfil #5 pearl cotton thread, from Sue Spargo's Eleganza collection. It was great fun to see how each pattern was different due to the variegation of colors. 

One our new designs has swags of asters, and the spiral trellis was perfect for the flower centers. These are also made with #5 pearl cotton, by Weeks Dye Works. 


After finishing the asters, I began working on the border of my fraktur quilt, which had berries. I was working with wool, so it would have be SOOOO easy to cut them out of wool and stitch them down. But I thought the dimension of the spiral trellis was just what it needed. So I made 36 of these little berries. And I loved them. But I might be ready for a short break from my favorite stitch. 


Have you tried the spiral trellis stitch? I hope you might give it a go, and see what you think. It is a fun way to add some pizzazz to your circles! 

Like a circle in a spiral, like a wheel within a wheel
Never ending or beginning on an ever spinning reel
As the images unwind, like the circles that you find
In the windmills of your mind! 
~Alan and Marilyn Bergman


Thursday, May 21, 2020

Tiny Circles Tutorial

There are a lot of ways to make circles for appliqué, and most work quite well. Karen Kay Buckley's Perfect Circles are a great tool to have, and we have used them many times. There are also plenty of YouTube video tutorials out there about making circles for appliqué using other methods.

 It is great that there are so many options, but a while back, I (Kara) wanted to make a lot of very tiny circles for a block I was making. I wanted them to be made out of fabric and not embroidered, but all the recommended methods were for much larger circles. Needleturn appliqué was certainly an option, but I thought that would be a bit tricky to keep the circles a consistent size. Necessity is the mother of invention, and I came up with this method to make a quantity of very small fabric circles using fabric, big nails, starch, and foil. 

This block needed tiny berries!

Recently, as I was working on the Fraktur borders, I realized that once again I would need a lot of tiny circles for berries. As I was making them, I thought the process would be a good tutorial for the blog, so here is my method for making these little circles.

Supply List

2" roofing nails (You need as many nails as the amount of circles you need)
Fabric of choice
Liquid Starch or Starch pen
Paint brush (if not using starch pen)
Aluminum foil (cut into 1" squares)


To find the right size nails, I needed nails with a large head. I raided the workroom in the basement and, thankfully, found what I needed. My husband has informed me that they look like roofing nails.


I traced around the head of nail on my fabric, making sure to leave enough space between the drawn circles to cut out an 1/8th of an inch allowance.

Circles ready to cut out with an 1/8th" extra around the drawn line.

After I had traced all the circles, I cut them all out. Next, I cut out my foil squares and I was ready to get started. I placed a foil square down, then my fabric circle and used my Traditional Primitives Starch Brush to coat my circle in starch. If you don't have this, then a paintbrush and liquid starch works just fine.

Ready to be brushed with starch


Traditional Primitives starch brush

When the fabric circle is coated (not drenched 😉) with starch, place the nail head directly in the center of the fabric. Next, fold up the edges of the foil around the nail head pressing tightly.

Center the nail head.


Wrap foil tightly around nail.

Continue this same process for all your circles, and then let all your prepped nails sit overnight. If you need your circles sooner that that, you can take a mini-iron and press all around the foil-wrapped nail head. This would be a bit tedious for a whole bunch of circles, but if you only need one or two, it would be faster.

Assembled and ready to dry overnight.

The next day, open up one of your circles carefully to see if it is dry. If it isn't, let them sit for another 6 hours or so. Once they are dry, you can take off the foil and gently remove your fabric circle from the nail.

Carefully remove the fabric circle from the nail.


They really are tiny!


A pile of berries ready to be appliquéd!


Stitched down


This may seem like a lot of trouble for a few berries, but it works well if you need to do a whole bunch, or if there is a particular fabric you want to use. They take very little time to stitch down since they are so small. Hopefully, you have enjoyed this "tiny" tutorial, and you will be able to use it for your appliqué!

Happy Stitching! Thank you for stopping by the blog!


Thursday, May 14, 2020

It's a Mystery!

Guess what we are doing this summer? 

It's a mystery! Well, the Woolen Oak Mystery Stitch-A-Long, that is. We are joining with eleven other designers to offer a free pattern each week, all summer long. And it is going to be fun!

Flyer from Calico Patch Designs, the organizer of the mystery

Kara and I (Teri) have been enjoying getting to know this group of talented ladies. And their work is spectacular! Check out this list:

June 1 - 7                      Calico Patch Designs                             calicopatchdesigns.com
June 8 - 14                   Blueberry Backroads                             blueberrybackroads.com
June 15 - 21                  My Red Door Designs                           myreddoordesigns.com
June 22 - 28                 Red Button Quilt Co                              redbuttonquiltco.com
June 29 - July 5           Rusty Crow                                               rustycrow.com
July 6 - 12                     Linen Closet Designs                             facebook.com/LinenClosetDesigns
July 13 - 19                   the cottage rose-Pattern Originals   cottagerosequiltshop.com
July 20 - 26                  The Woolen Needle                                thewoolenneedle.com
July 27 - Aug 2             Through The Needle’s Eye                  needleseyestories.com
Aug 3 - 9                        Traditional Primitives                          traditionalprimitives.com
Aug 10 - 16                    Yellow Creek Quilt Designs                yellowcreekquiltdesigns.com
Aug 17 - 23                    Sew Cherished                                         sewcherished.com
Aug 24 - 31                    Calico Patch Designs                             calicopatchdesigns.com

So each Monday, a different designer will release a free digital pattern, which will be free for download for the duration of the week, after which it will be available for sale. We will all be offering kits for sale, with all fabric and wool material needed to complete each block, and some of the designers are offering thread kits for sale as well. The kits will become available for purchase on the day the pattern is released, and we are preparing to be ready to ship as soon as orders are placed. We have seen some sneak peeks of most of the blocks in progress, and we are excited! We think you will be, too. 

As for the rest of the details, well...it is a MYSTERY!! 

You can join the Facebook group for current updates by clicking here.

If you are on Facebook, joining the Woolen Oak Mystery Stitch-A-Long group will introduce you to each of the designers. Every other day, one of us is introducing herself—or in our case, herselves—and offering a chance to win a $50 gift certificate on her website. What a great way to get to know these talented wool appliqué artists. And perhaps to meet some new friends who share your passion. At this point, the group is over 2600 people strong. That's a lot of new friends!

A preview to watch

So, who's up for some summer mystery stitching?!

Thursday, May 7, 2020

Updated: Hopeful Bluebird Stitch Along—Week 3

Updated: We have enjoyed our Hopeful Bluebird Stitch Along! While the pattern for this lovely wall hanging is no longer available for free, it is available in our web store. It's never too late to join our Facebook group where we have been inspired by all the beautiful work that has been shared.

No deadlines...just jump right in! 

And just like that, we are on our last week of this Stitch Along. We hope everyone is having fun and enjoying making this block. This week, we will work on the bluebird and finish up the embroidery. Also included will be the directions to piece the border and turn it into a wallhanging. 

Here we go!

The bluebird has four pieces that are positioned with the right wing first, the breast next, then the body, and finally the left wing.


Ready to be stitched down.

Once you have stitched your bluebird down, it's time to bring him to life with a little embroidery.


If desired, mark the eye and beak.

With 4 strands of black floss, make a French knot for the eye.
With 3 strands of dark grey floss, make 3 straight stitches for the beak.

Straight, stem, and fly stitches embellish our little bluebird.
Use one strand of dark grey or black floss to stem stitch the banner hanger.

The poppy center is created with a woven wheel stitch using #8 green pearl cotton. I used the same color for this as I did for the fly stitches on the leaves. To make the center, start with 5 straight stitches arranged like a star as shown in the picture below.

Five straight stitches arranged in a star shape

Bring the needle up close to the center of the star, and between two stitches. Begin weaving the thread over and under the spokes, snugging them up closely. This works best if you use a tapestry needle because it doesn't have a sharp tip. If you don't have one, using the eye end of your needle will work as well. Continue going around until you can no longer see the spokes, and then take your needle to the back and tie off. (To see a video of this stitch, go to Mary Corbet's video HERE.) 

The finished woven wheel center.

With 2 strands of black or dark grey floss, surround the woven wheel with straight stitches to complete your poppy.

The poppy is all done!

To stitch the word "welcome", I used the Press and Seal™ plastic wrap method. The Press and Seal™ has one side that is sticky and adheres slightly to the wool. If you don't have access to this product, tissue paper works as well. Start off by tearing a piece of the plastic wrap and position it over the word "welcome". Then take a sharpie or gel pen and trace over the words. I used a white gel pen, as that is my go-to product for marking most everything.

Plastic wrap positioned over the pattern

Once your words are traced, center the plastic wrap on your banner and pin. 

Ready to stitch!

To stitch the words, I used a dark grey #8 pearl cotton, but 3 strands of dark grey floss would work as well. I used a chain stitch for the thicker parts of the letters and a stem stitch for the thinner parts. Stitching through the plastic takes a little bit of getting used to, but this method allows you to use many different fonts for your stitched letters. 

Once you are finished stitching, carefully remove the plastic wrap by holding your finger down on the embroidery and then tearing it off. Use a pair of pointed tweezers to get the small bits out.

These Martelli tweezers are great for removing the tiny pieces.

The finished lettering!

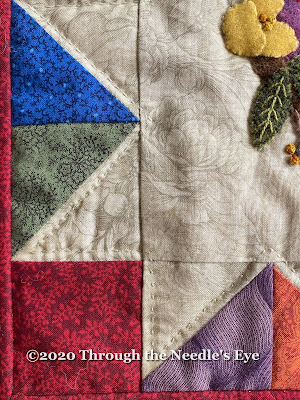
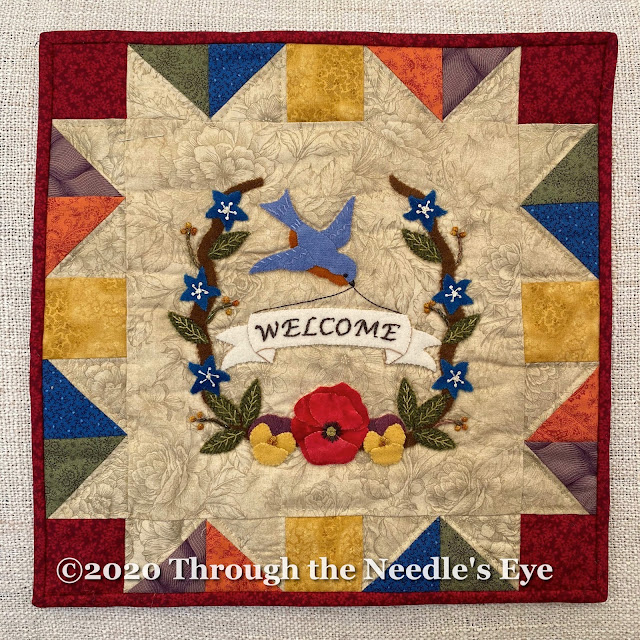
The link for the border directions is below, and hopefully you will find them easy to follow. This was the first time that I had big-stitch quilted anything and I loved it! I used Valdani #12 in a shade that blended with my background. First I quilted around the block, and then quilted in the border about an eighth of an inch away from the seam—this accented the secondary star that formed by using the background fabric in the border.

Big stitch quilting around the border
Squares all ready to go for the border


All quilted and bound!

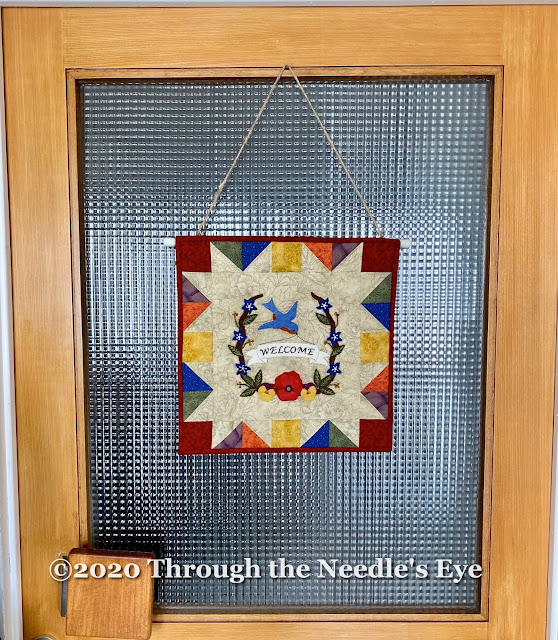
I chose to turn this block into a wallhanging, but you may have other ideas for yours, and we would love to hear what those plans are! 

We hope you have had fun on our first ever stitch along, and we hope to do more of these in the future. The pattern and the instructions will be free on the blog for the next month, and we will keep the Facebook group open so you can share your progress and finished blocks with everyone. Sharing your work is encouraging for your fellow stitchers, and it is great to see the different color palettes everyone chooses. 

It is hard to keep our distance from the people we love, but hopefully it won't be long until we can welcome our friends and family back into our homes—this wallhanging will be hanging on our door waiting for that day!


Hopeful Bluebird Week 3
Hopeful Bluebird Border Directions