Thursday, May 20, 2021

"In the Garden" Again: Rose

Both Kara and I (Teri) have June birthdays, so it is no surprise that we enjoy creating roses. You will see them in many of our designs—in fabric, ribbon, and embroidery. And thus, we knew we would dedicate a block In the Garden to our June flower, the Rose. We layered the petals and accentuated them with stitching and a sprinkle of beaded dewdrops. As you'll see, there are other ways to interpret the pattern. How will your rose bloom?


We love when stitchers make the patterns their own:
one student shared her dimensional rose, created with a
long strip of hand-dyed wool, twisted and tacked in place.
There's always room for adventure—even with roses!

You can find our Rose pattern—and all of the In the Garden patterns—in our website shop. This week, you can use the coupon code ROSE10 to receive a 10% discount on the printed Rose pattern with ribbon.

🌹🌹🌹🌹🌹🌹🌹🌹🌹🌹🌹🌹🌹🌹🌹


Wednesday, February 14, 2018

"In the Garden"—Rose

Happy Valentine's Day! In the spirit of the holiday, we stitched a rose for our garden this month. Whether the red rose signifies love or warm, summer days for you, who doesn't enjoy the beauty of this perennial floral favorite?

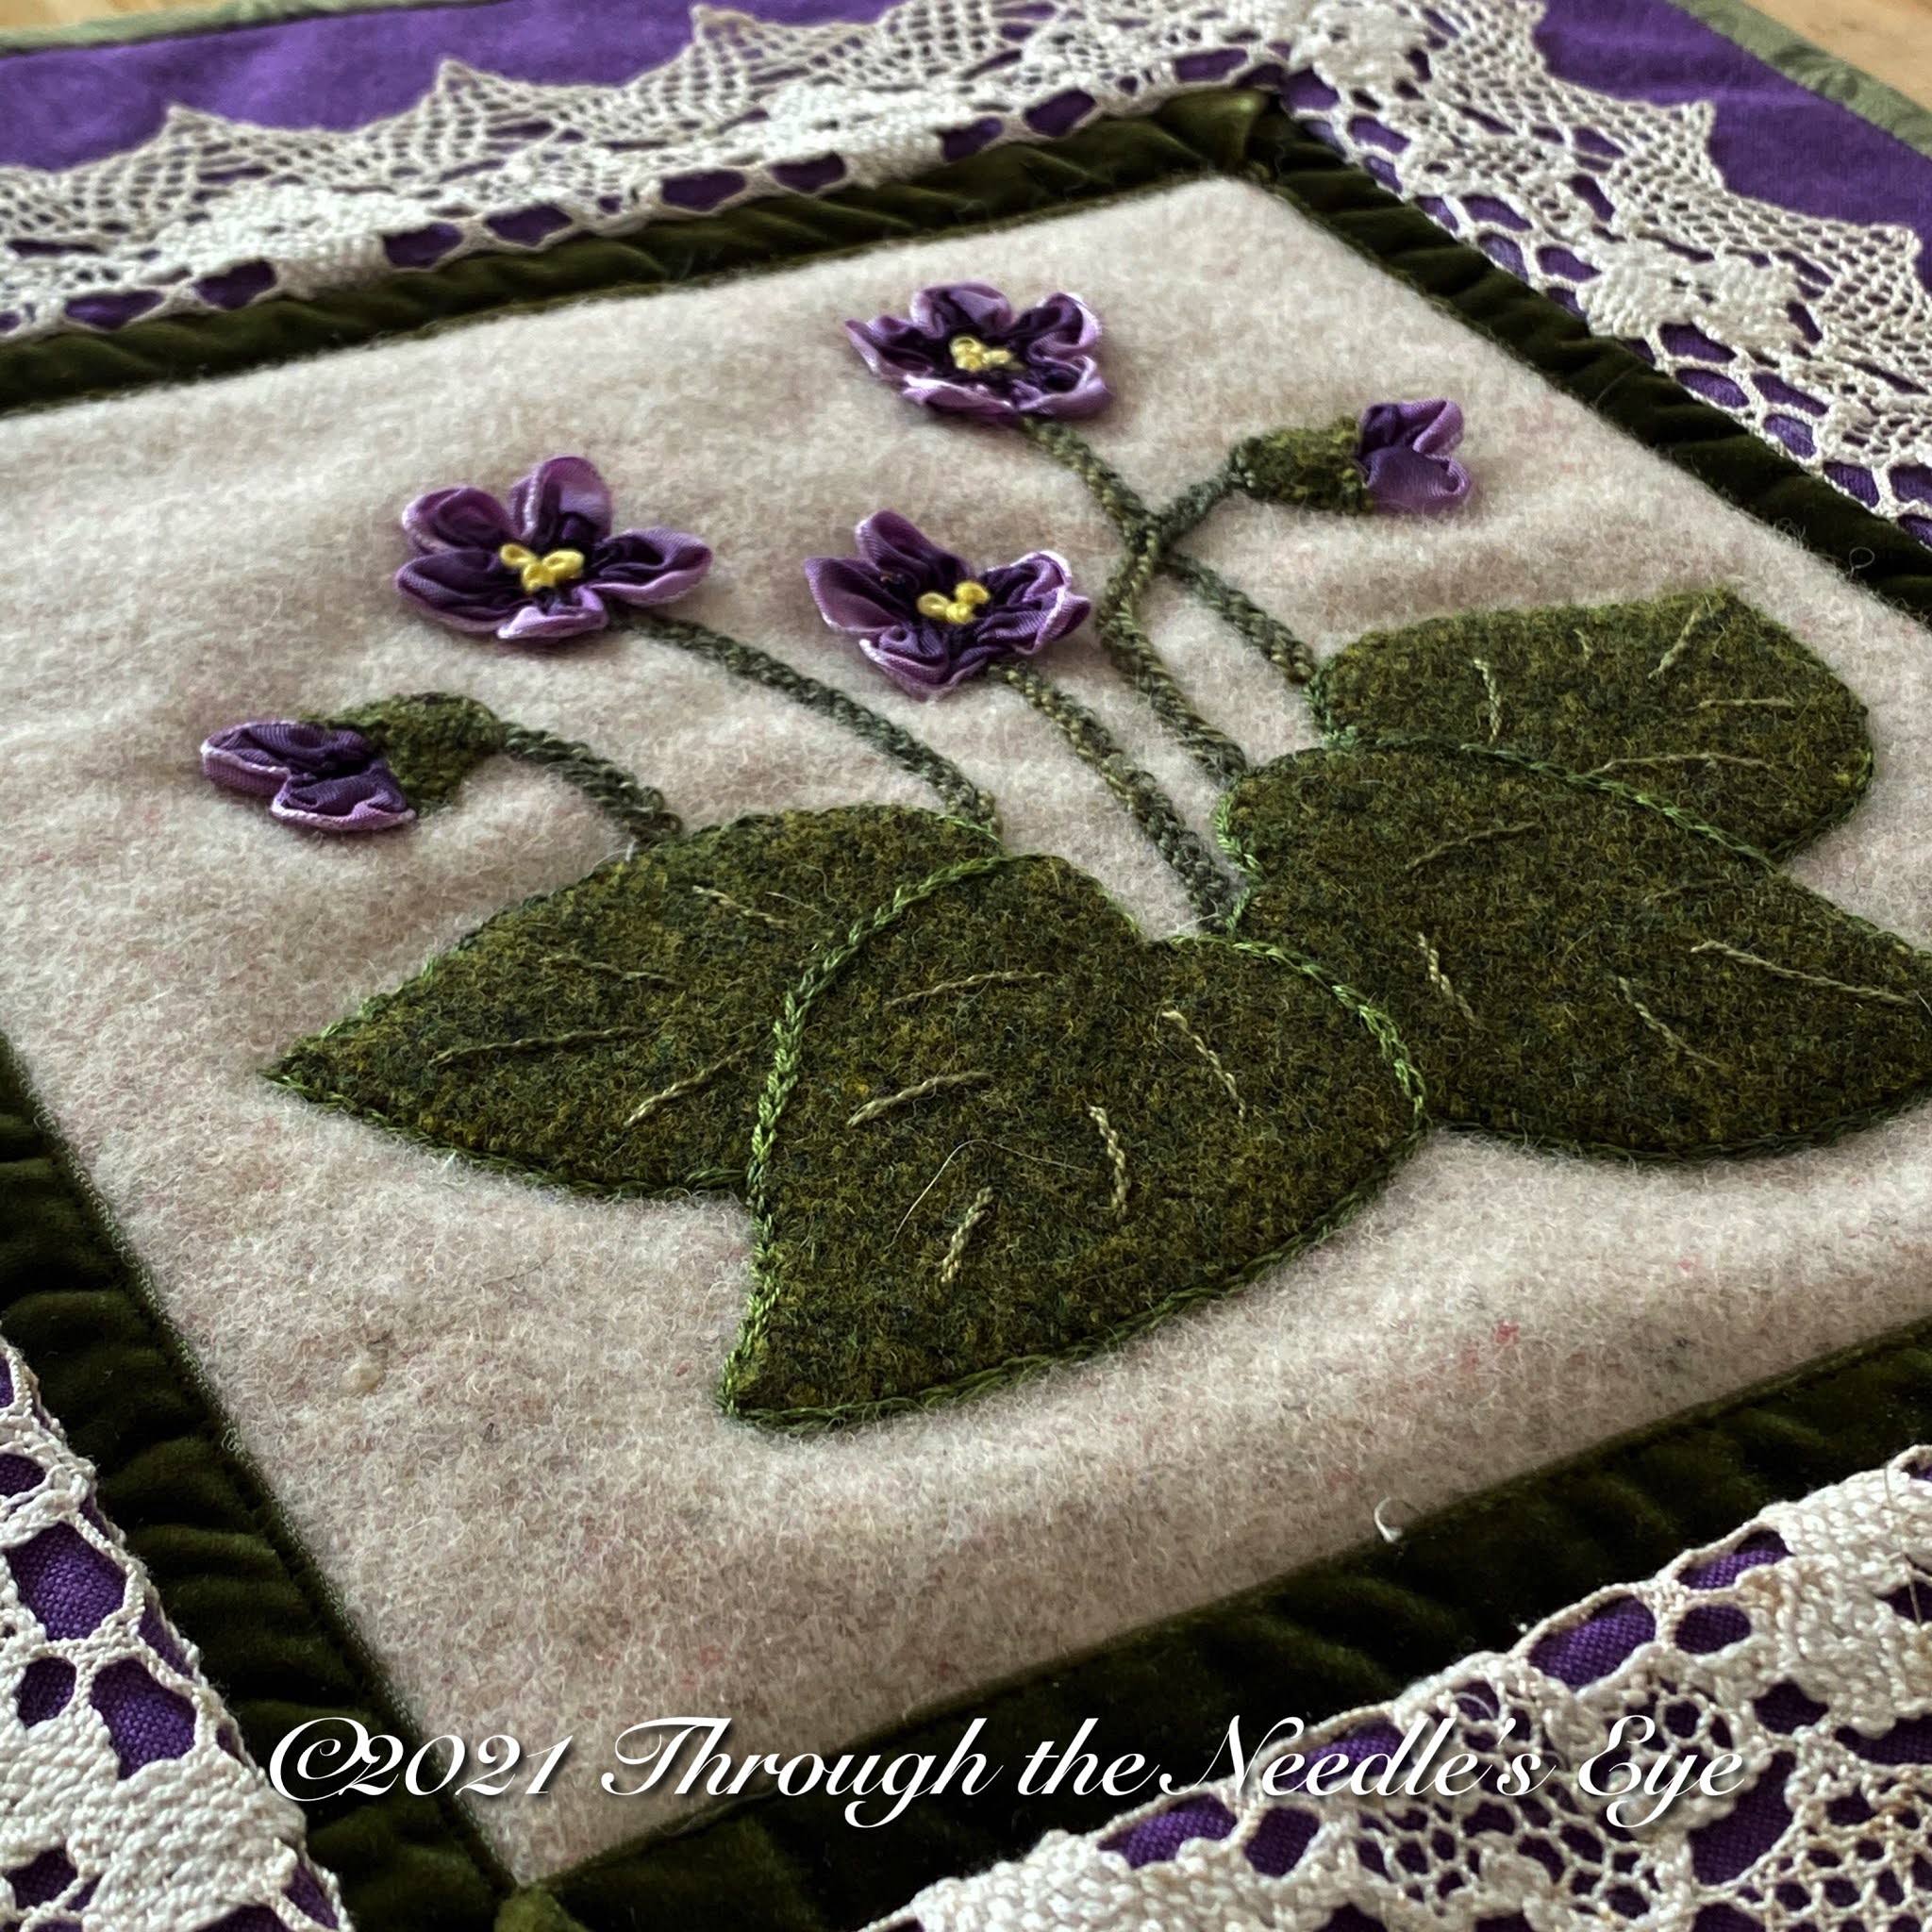
While the rose is made with wool, the buds are created using wired ribbon, adding a different texture, and of course, a bit of fun! We also added beads around the bloom for a bit of sparkle—a hint of early morning sun shining on dew drops, perhaps. 

This new block in our In the Garden Block of the Month series is now available on our website, and it comes with the ribbon needed to stitch the buds and calyxes. Here are a few highlights of the rose.

The leaves are placed and appliquéd, and then the rose petals. Each petal is surrounded by a chain stitch. A feather stitch creates the leaf veins, and a blanket stitch with the spokes going outward toward the tip form the serration of the leaves.

The folded rosebud used a 2-inch piece of wired ribbon. From the center point, each half is folded down at a 45-degree angle, so that the edges meet. 

front
back

Using the wired edge on the back, fold down again to shape the ribbon bud so that it will fit neatly behind the sepal pieces. 


For the smaller bud, use a 3/4-inch piece of ribbon. Fold raw edges under as pictured below, and then angled, so that it will be covered by the wool piece.


When the buds are the desired shape and size, place them on the background and tack them so they are secure, but the stitches will not be seen. Appliqué the wool sepal pieces on top of the ribbon buds with matching thread. 

Using hand-dyed 4mm-wide silk ribbon, twist your ribbon and do a
long straight stitch to create the small stems between the rose and the buds. 

Create the small leaves at the base of the buds using a ribbon stitch with that same ribbon.
Using wool thread, do small feather stitches randomly around the buds.

Two bullion stitches top the smaller bud, but you could also use the twisted ribbon, if you choose. Finally, attach size 15 red seed beads randomly within the chain stitches around the rose petals.

We had a great time making our roses bloom in our class at
Primitive Homespuns Wool & Needleworks...

...and we were excited to see what next month will bring to our gardens!

If you would like to join us In the Garden, all the patterns for the first five months are now available on our website: needleseyestories.com. Any ribbon needed to complete the patterns is included with the pattern. Our newest addition is, of course, the Rose.

Rose

Past posts in the BOM series:

Thursday, May 13, 2021

"In the Garden" Again: Cardinals and Holly

Use coupon code CARDINAL10 for
10% off the printed block pattern. 


We are certainly stitching through the seasons quickly! This week, we might stitch a bit of snow onto our holly leaves. When I (Teri) first made this block, it seemed to call for a few snowflakes glistening on the holly leaves. But I always thought this would make a lovely stocking, so last fall, I did a bit of rearranging and designed the Cardinals and Holly Stocking pattern. I skipped the snow on that one. So you see, there are always options, depending on your mood!


❆❆❆❆❆❆❆❆❆❆❆❆❆❆❆❆❆❆❆❆


Thursday, January 25, 2018

"In the Garden"—Cardinals and Holly

We are spanning the seasons In the Garden! The January block in our BOM series is Cardinals and Holly, seen prolifically here in Maryland in the winter. How about where you live?

We're having a wonderful time in our monthly classes at Primitive Homespuns Wool & Needleworks. A number of ladies have been there every month, and some just choose a favorite block or two and join those classes. We tell some stories, and share quite a few laughs. Stitching with friends is always a fun time! If you can't join us at the shop, you can still stitch along with us: the patterns are available on our website—needleseyestories.com—and the Cardinals have joined the garden.

Here is a photo tour of how these birds took flight.

The branches were stitched first, and then all the other components
were stapled to the background to keep them in place while stitching.

I like the puff that is achieved when I appliqué and embroider
the units; I miss that when it is fused.

With everything in place, this made some great car trip stitching
when we traveled from Florida to Maryland.

I used Valdani #12 pearl cotton for the center vein.
To be sure I stitched the arc in the outer veins, I marked them
with my chalk pencil, which easily disappeared after stitching.

Whenever I stitch a bird, I feel oddly compelled to include some feather and fly stitches.
The tail is filled with "feathers" and the wing with "fly"—of course!

I stitched the berries in place, and thought that I could be finished.
But it is winter, after all, so I decided a bit of snow might be nice.  

I added random straight stitches and knots with Weeks Dye Works floss—aptly named Snowflake.
Do you know how many variations of white floss there are? It took me a while to find just the right one.
I confess, the name helped me decide!

A few size 15 beads added some sparkly ice to the snow.

Mr. Cardinal looks rather happy!


We had some Show and Tell with blocks—in progress or finished—from previous classes.


Kara and I are enjoying creating our wooly/ribbony garden. Embellishing with embroidery is always our favorite part, and these blocks give us plenty of opportunity for that. The Cardinals and Holly pattern is now available on our website, both in digital and hard copy format, as well as all the patterns in the series thus far.

We would love to have you join us In the Garden!

Cardinals and Holly

Past posts in the BOM series:

Thursday, May 6, 2021

"In the Garden" Again: Violets


This week we present one of my (Kara) favorite In the Garden patterns—Violets. This pattern started out in a different format, but we knew it would be perfect for this series. It is the first pattern that uses French ombre wired ribbon and we think you will love it if you haven't worked with it before. Embroidery stitches play a big part in creating the wonderful dimension of the leaves and stems. A simple chain stitch defines the leaves and one of our favorite stitches, the Pekinese, creates the stems. You can make this for your In the Garden quilt or you can turn it into a sweet wallhanging (You can read how we created our wallhanging HERE.) You may want to make both!


💐💐💐💐💐💐💐💐💐💐

Until May 12th, use the coupon code VIOLETS10 to receive 10% off your Violets pattern purchase!

Thursday, December 14, 2017

"In the Garden"—Violets

Roses are red, 
Violets are blue.
God can make violets,
But so can YOU! 

At least you can, if you use ribbon! This month's Block of the Month in our In the Garden series will have you creating lovely violets out of wired ribbon. Are you ready? Here we go! I (Teri) will give you a quick pictorial tour of the methods used to create these life-like blooms, and  then you will be ready to start "planting." In our class this past weekend, I heard several "I can't make that" comments become "Wow! I CAN make this flower!"

December BOM: Violets


The Leaves
I cut the leaves out as one unit and delineated them with embroidery.
You could, if you prefer, cut them and appliqué them as separate units.
I staple them in place, and then carefully remove the staples after appliquéing. 


I used a Bohin chalk pencil to mark the lines between the leaves,
The chalk shows up easily on the wool, and doesn't last.


A chain stitch with two strands of floss outlines the individual leaves. On the edges, I took the needle from the background a tiny bit into the edge of the leaf, so that the chain "hugged" the raw edge.


To make the two center leaves pop and appear closer, I used a lighter wool thread to do a chain stitch on top of the
darker green floss chain stitch. Because the wool thread was a bit thinner, it nestled inside the previous chain.
Veins are then added using a stem stitch; I used size 12 pearl cotton.


The Flowers
Cut a piece of wired ribbon 5 1/2 inches long. Starting 1/4 inch from the edge,
mark lines on the ribbon at 1-inch intervals.


Along the first line, start at the bottom and do a running stitch by the line, and
across the top, just under the wire. Use a thick or doubled thread for gathering. 


When you reach the next marked line, stitch down one side and up the other. Be sure that your thread overlaps the edge of the ribbon. Gather to create your first petal.


Continue to do a running stitch and gather after each petal.


After gathering all five petals, knot the thread but leave the needle and thread in place.


Manipulate the petals into a flower shape, using the wires to shape the petals.


Use your needle as a tool to pull the center of the petals together.
Take some large stitches to secure the flower center.


Don't worry if it doesn't look perfect; the center knots will be added later.


Use tack stitches to secure the blooms to the background, stitching in the gathers of the
flowers with matching thread. The buds are created with two "petals" rather than five.


The Stems


A pekinese stitch was used to create the stems. I used a size 5 pearl cotton
to make a nice thick stem. First, mark the stem lines and do a back stitch. 


The thread is then woven on top of the piece through the backstitches. For a great tutorial of the pekinese stitch, click here.


We are having such fun creating these designs, and we hope you will join us on our BOM gardening journey. All patterns are available in our website store (https://www.needleseyestories.com/shop), and the ribbon is included with the pattern for those with ribbon blooms. Both digital and hard copy patterns are available, although to get the ribbon, you need to order a hard copy. (Like you couldn't guess that we wouldn't send you digital ribbon!) 😄

Happy stitching—let's make some violets!!


To read about the other blocks in our In the Garden series, click on the links below.