Showing posts with label wool applique. Show all posts

Wednesday, November 23, 2022

"Gnome-shave" November (or How to Attach a Beard)

Instead of "No-shave November," over here it is "Gnome-shave November," as our gentleman gnome has a fun and curly beard! We have used curly wool to give some great texture to our gnome's beard, and the curly wool is available as part of the embellishments in our wool kit. While it might look complicated, we have broken the process down for you in a series of pictures.


Use just a small amount of curly wool—it doesn't take much.


Roll it around in your hands until you have a small, slightly compacted ball of wool. 


Pull apart the ball of wool to fit your beard shape.


Stick a few pins in the wool, then thread your needle with matching thread and start stitching at the top of the beard. 


With small tack stitches, couch the wool down working your way around the face.


Down one side of the beard...


...until you get back to where you started.
Your beard will look very fluffy and somewhat out of control. 


In order to tame that beard, take small tack stitches within the beard to tidy up the fluff. As you are taking those stitches, you can tack down any stray fibers and bring them under control. You will use a lot of tack stitches.

So that is how we attached the wool for our gentleman gnome's beard. If you don't have curly wool, wool roving would work, or just use the plain cream wool and add some stitching within it with wool thread.

Have fun with it!


Thursday, April 14, 2022

Nesting Nuthatch

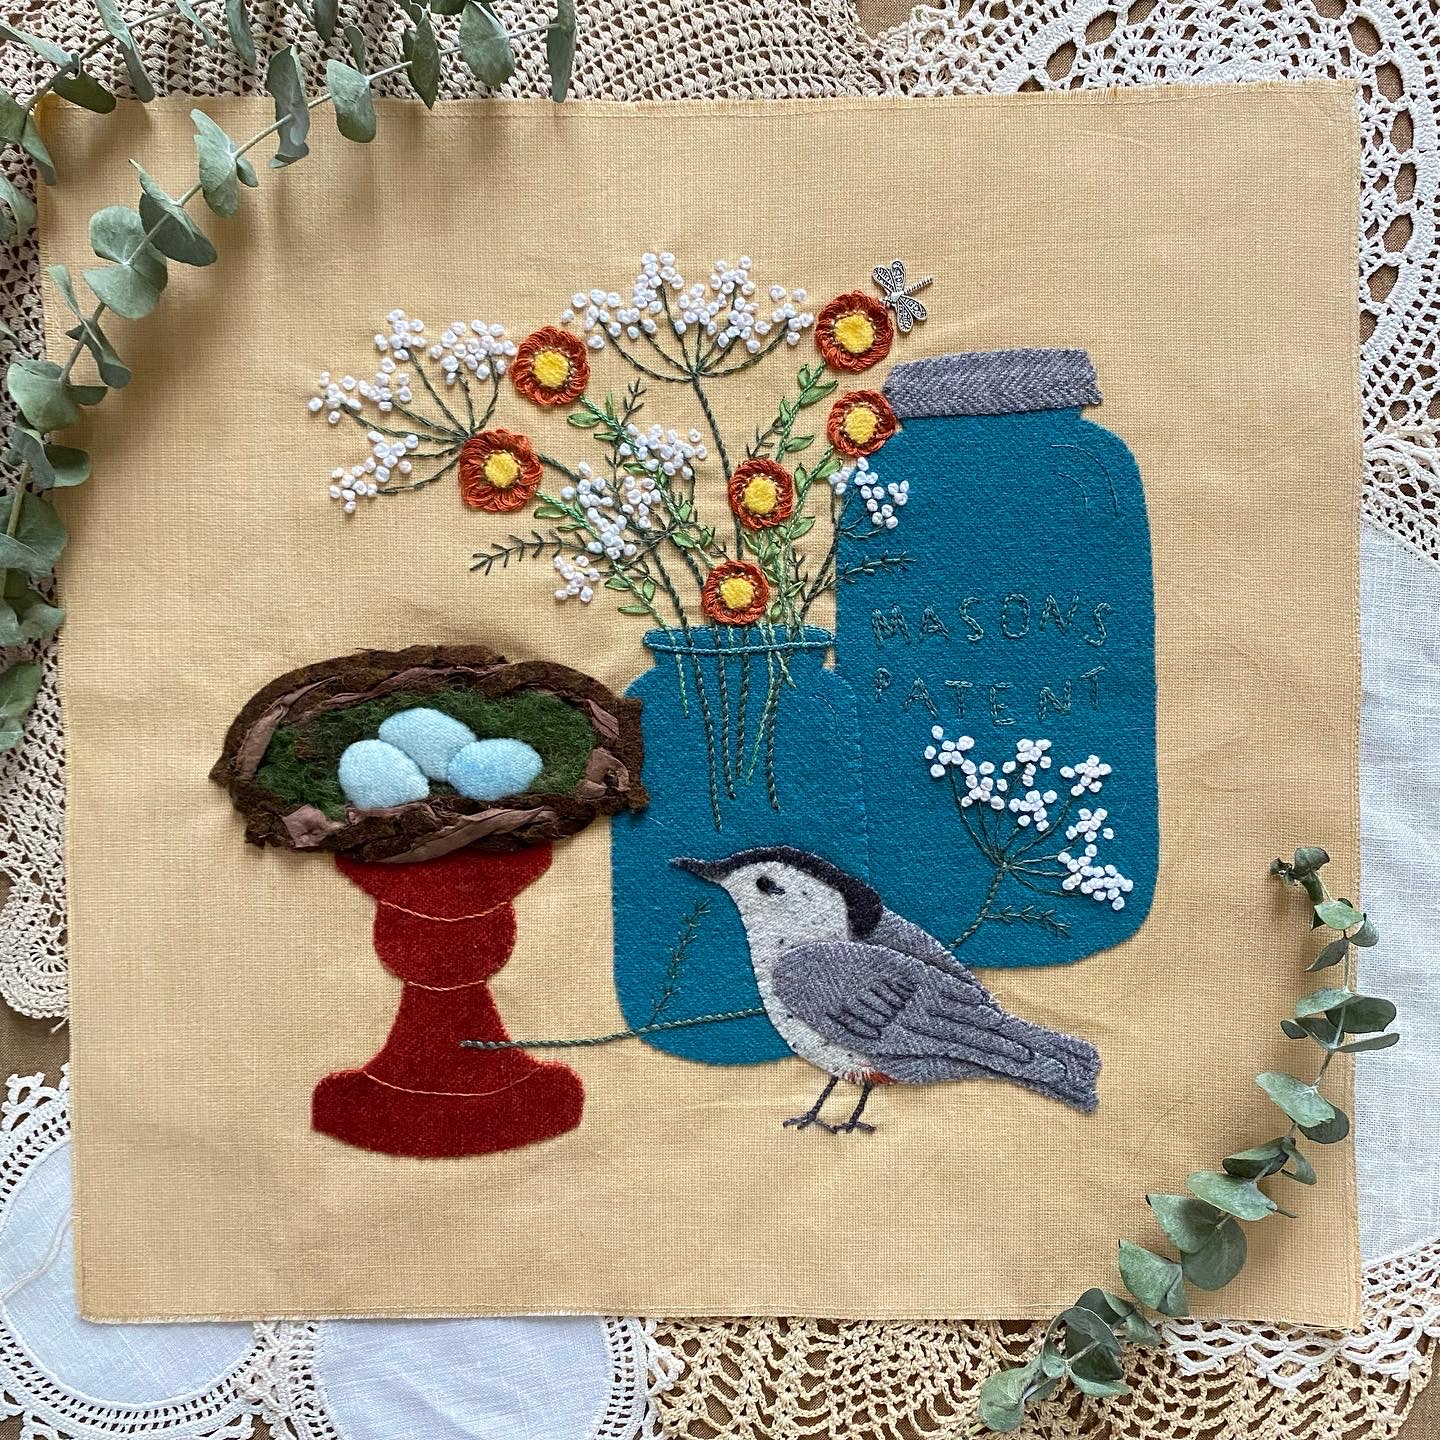
We are thrilled to have had such a great response to our Blue Jar Medley offering, Nesting Nuthatch! If you have followed us for any length of time, you will know that birds of all kinds are near and dear to our hearts. I (Kara) particularly love the nuthatch, as it was one of my Grandmother's favorite birds.


There are a few new techniques in this block—none of which are difficult, but we thought we would show some more detailed pictures for some of those techniques. Let's show you the nest according to your pattern directions. 

The Nest
In the nest directions #2:

Gather your two brown wool “noodles” and the piece of sari silk ribbon. Holding them all together, begin to coil them around on top of the pedestal, twisting and overlapping the strips. Pin in place loosely.

Nest materials

Gather your two brown wool noodles and your piece of sari silk.

Holding them all together, begin to coil them around
on the top of the pedestal.

Twisting and overlapping the strips.

Pin in place loosely.

Nest Directions #3:
Starting at the top of the nest, use brown thread and take tack stitches to secure the nest pieces and build your nest, arranging as you go. You may want to snip the pieces to help with arranging. Stitch the nest down to the bottom inch, and then stop, leaving the remainder of the nest pinned.


Nest Directions #4: 
Take the green roving and thinly spread it over the center of the nest, as pictured. Stitch into place with a few tack stitches. Note that the roving will only be in the center, and not out to the edges, to give the illusion of the inside of the nest.


Nest Directions #5: 
If you want to stuff your eggs, cut a couple of layers of batting scraps (we used a high loft poly batt) a bit smaller than the eggs. Layer the batting under the eggs, one at a time, beginning with the back egg. Appliqué in place, being sure the batting is beneath the egg. You may find it easier to use individual stab stitches around the eggs to help achieve the rounded egg shape.


Nest Directions #6: 
Finish the front of the nest, being sure to stitch a bit of the nest material over the bottom of the front two eggs.


The Straw Flowers
The straw flowers are made with a yellow wool center and a Pekinese stitch applied around that center.


If you would like to see some close-ups and an entire post about the Pekinese stitch, follow the links below:


We also have some close-up pictures of the ribbon stitch in a Facebook post linked below, as well as a link for a whipped chainstitch (Queen Ann'e lace stems) tutorial:


As hard as we try to make sure our patterns are complete, we are human and sometimes little things slip through our proofreading brains. Neither Teri nor I caught our lettering omission until now, so we have sent out an email to all those who have downloaded our pattern and have fixed the pattern for future downloads. If you didn't get the lettering addition, then you can download it below. We also are linking a post that we have written earlier on using Press and Seal.

Mason jar lettering: Updated template with lettering

Hopefully these pictures and links will help you as you stitch our sweet little nuthatch block. We loved making this block, and we can't wait to see the finished quilt with all the designers' blocks included!

Happy Stitching!


Thursday, January 20, 2022

Blue Jar Medley Mystery Stitch-Along

We are happy to announce the  Blue Jar Medley Mystery Stitch-A-Long.  

Mark your calendars and tell your friends about this FREE event: you don’t want to miss it! Beginning January 31, 2022, and each Monday following, one participating designer will  feature their “Blue Jar” with a FREE downloadable pattern available during each designer's  spotlight week! After each spotlight week, digital patterns will be $5.00 for the remainder of the program. Complete the project with a Finishing Pattern available FREE, April 25th-May 2nd 2022. Fabric kits, threads, printed patterns, and more will be available to help make a beautiful quilt! Kits will include wool, fabric, and embellishments. Follow the schedule below and visit each individual designer's website/social media to order or download the free pattern...for a limited time!

Preorders are being accepted now! 

  • Jan 31 - Feb 4 Calico Patch
  • Feb 7- 11 The Woolen Needle
  • Feb 14 - 18 Red Button Quilt Company
  • Feb 21 - 25 Linen Closet Designs
  • Feb 28 - Mar 4 My Red Door Designs
  • Mar 7- 11 Blueberry Backroads
  • Mar 14-18 Sew Cherished
  • Mar 21 - 25 The Cottage Rose
  • Mar 28 - Apr 1 Traditional Primitives
  • Apr 4 - 8 Yellow Creek
  • Apr 11 - 15 Through the Needle's Eye
  • Apr 18 - 22 Rusty Crow
  • April 25-May 2 Calico Patch: Finishing
Remember that it will be a tad different this round: the digital pattern will be free for the designer's spotlight week only, and then revert to the low price of $5, and all printed patterns will be only $6 for the duration of the stitch-along. So follow along, and tell your friends about it, so you call all join in from the beginning. This will be a fun one, for sure!

For more information and links to each designer's website, click HERE. And if you haven't yet joined our Woolie Friends Facebook page, hop on over and join us!


Thursday, August 26, 2021

Potsticker Fun for Fall

This week we introduced our second round of Potstickers for your plants—Fall Fun Potstickers!

These little quick little projects will give your autumn foliage some panache this fall. They go together so quickly and when you buy our kit, all wool, flannel, thread, buttons, and printed patterns are all included—for the low cost of only $19.50! 

When creating these, we really wanted to make something that would be complete so you could take them with you to the doctor, school pick-up, or wherever you go that you might need something easy to stitch. As an added bonus, for buying the kit, you will receive the pumpkin pattern free, along with its sweet little leaf button. 


Each potsticker has its own special charm whether it is the three dimensional sunflower, the beaded wreath around the maple leaf, or the tiny squirrel holding a very tiny acorn charm. All the charms, beads, and buttons are included in the kit.


Primp and pamper your plants this fall with their own decor, and if you want to give them a patriotic feel, you can make the first set, our Patriotic Potstickers.


If you would like to create your own set of Potstickers, click on the link below to pick up your kit!


Thursday, August 19, 2021

Academy 2022 Offerings—Part 2

We are so excited about The Academy of Appliqué next year that we can hardly wait! The joy of anticipating a week with stitching friends, old—perhaps we should say experienced—and new always fills us will delight, but this year promises to be something especially wonderful!

Last week, Kara shared two of the blocks we will be teaching in Williamsburg next year. In both sessions, we are offering choices for you, so that you can choose either option, or both. In our first session, we add the Butterfly and Trillium to the Cascading Creek—both blocks from our Woodland Reverie series. Two years ago, we introduced this series with our spring and fall blocks (click HERE to see), but there is much fun to come as we explore the woodlands.

We are stitching each of our Woodland Reverie blocks on both a black background and a neutral one. It is fun to see how the colors behave so differently on the contrasting backgrounds. You have the advantage of seeing how the two colorways compare. This block begins with a basic papercut design for the fern; we use back-basting and will teach that method, but if you have a tried-and-true favorite method, that's always fine with us. Embroidery creates veins on the fern, and we created an appliquéd frame in the center using Dupioni silk to showcase our butterfly.

The trilliums are made with French wired ombré ribbon, and the center sparkles with metallic threads. 

The star of this block is a beautiful butterfly, ready to fly away. His wings are free to flap in the wind, as he is attached only in the center. The fun of discovering the perfect symmetrical fabric to fussy-cut for wings is an adventure in itself!


Many of the techniques used in the Cascading Creek and Butterfly and Trillium overlap, so while you might choose to work on one of them during class, you will be able to accomplish both if you desire.


Our second session will cover the center medallion of our Village Wanderings quilt, as well as the corner blocks, the seasonal trees. Because every village needs trees! We will cover the ribbon skills needed to complete the trees, as well as discuss the embroidery used for the little wool birds.

The bluebird sits in the budding spring tree.

A goldfinch in the leafy summer branches.


The woodpecker helps the turning leaves to fall.

The cardinal perches atop a barren snow-speckled wintry tree.

That is a lot of fun to have in one week!! Remember that registration opens at noon EDT on Labor Day. We don't envy you having to make choices among all the wonderful class offerings this year—there are so many wonderful classes from which to select! Of course, we would LOVE to have you joining the fun in one of our sessions, but whatever class you choose, please do plan to stop by to say hello. We'd love to say hi, or to meet you if we haven't yet had that pleasure. See you in February!!

To see the Academy of Appliqué class catalog, go to www.academyofapplique.com