Showing posts with label sari silk ribbon. Show all posts

Thursday, April 14, 2022

Nesting Nuthatch

We are thrilled to have had such a great response to our Blue Jar Medley offering, Nesting Nuthatch! If you have followed us for any length of time, you will know that birds of all kinds are near and dear to our hearts. I (Kara) particularly love the nuthatch, as it was one of my Grandmother's favorite birds.


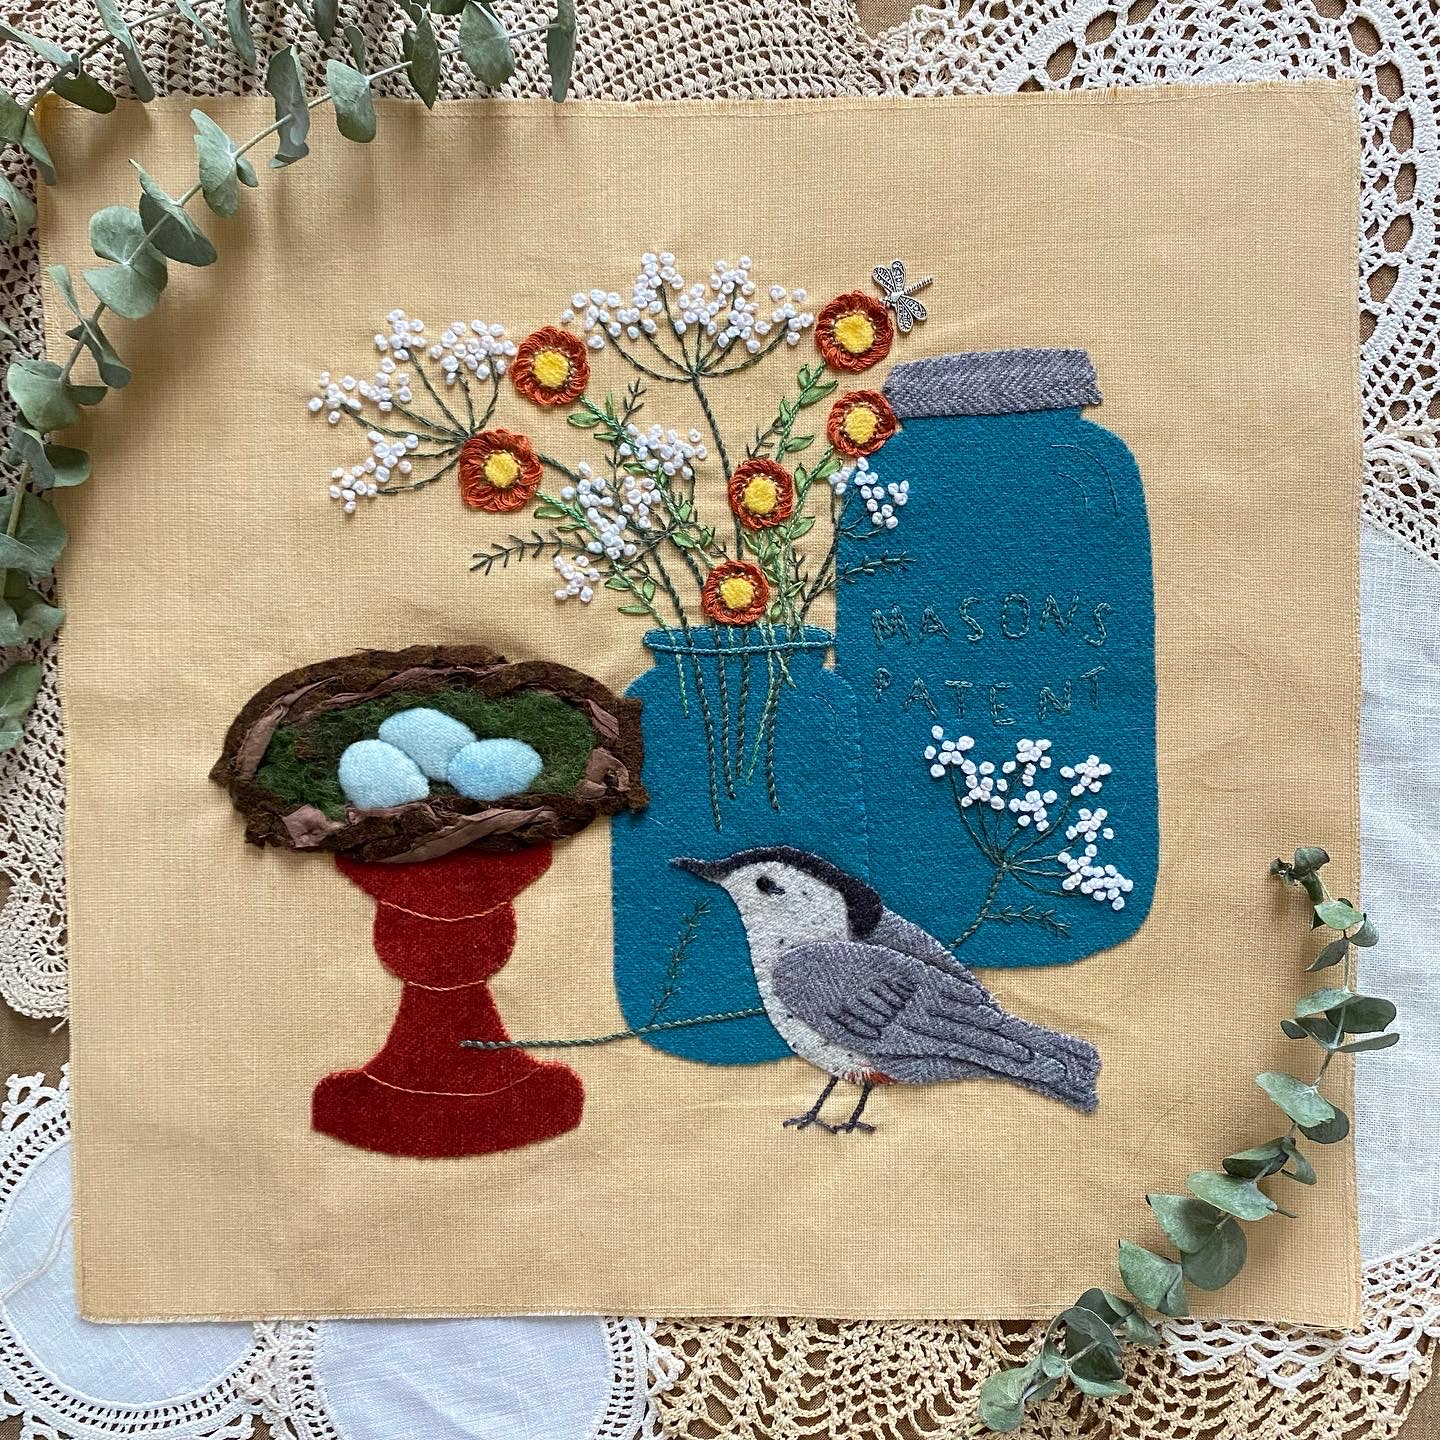
There are a few new techniques in this block—none of which are difficult, but we thought we would show some more detailed pictures for some of those techniques. Let's show you the nest according to your pattern directions. 

The Nest
In the nest directions #2:

Gather your two brown wool “noodles” and the piece of sari silk ribbon. Holding them all together, begin to coil them around on top of the pedestal, twisting and overlapping the strips. Pin in place loosely.

Nest materials

Gather your two brown wool noodles and your piece of sari silk.

Holding them all together, begin to coil them around
on the top of the pedestal.

Twisting and overlapping the strips.

Pin in place loosely.

Nest Directions #3:
Starting at the top of the nest, use brown thread and take tack stitches to secure the nest pieces and build your nest, arranging as you go. You may want to snip the pieces to help with arranging. Stitch the nest down to the bottom inch, and then stop, leaving the remainder of the nest pinned.


Nest Directions #4: 
Take the green roving and thinly spread it over the center of the nest, as pictured. Stitch into place with a few tack stitches. Note that the roving will only be in the center, and not out to the edges, to give the illusion of the inside of the nest.


Nest Directions #5: 
If you want to stuff your eggs, cut a couple of layers of batting scraps (we used a high loft poly batt) a bit smaller than the eggs. Layer the batting under the eggs, one at a time, beginning with the back egg. Appliqué in place, being sure the batting is beneath the egg. You may find it easier to use individual stab stitches around the eggs to help achieve the rounded egg shape.


Nest Directions #6: 
Finish the front of the nest, being sure to stitch a bit of the nest material over the bottom of the front two eggs.


The Straw Flowers
The straw flowers are made with a yellow wool center and a Pekinese stitch applied around that center.


If you would like to see some close-ups and an entire post about the Pekinese stitch, follow the links below:


We also have some close-up pictures of the ribbon stitch in a Facebook post linked below, as well as a link for a whipped chainstitch (Queen Ann'e lace stems) tutorial:


As hard as we try to make sure our patterns are complete, we are human and sometimes little things slip through our proofreading brains. Neither Teri nor I caught our lettering omission until now, so we have sent out an email to all those who have downloaded our pattern and have fixed the pattern for future downloads. If you didn't get the lettering addition, then you can download it below. We also are linking a post that we have written earlier on using Press and Seal.

Mason jar lettering: Updated template with lettering

Hopefully these pictures and links will help you as you stitch our sweet little nuthatch block. We loved making this block, and we can't wait to see the finished quilt with all the designers' blocks included!

Happy Stitching!


Tuesday, December 4, 2018

Christmas Present Ideas


Are you frantically sewing for Christmas and the holidays? Are you trying to get all the sewing done in addition to the other daily projects? Things can get a little crazy for stitchers around the holidays. We want to give our best to our family and friends, but we all probably wish we had started these projects sooner. Regardless of the late hour, we will stitch till our fingers are sore, and we will be happy when each gift is finished. After all the holiday stitching, wouldn't it be nice to sit with a bunch of your friends and just stitch in a relaxed atmosphere with no deadlines (and no laundry)? Well, have we got the place for you! 


The Academy of Appliqué in Williamsburg, Virginia, is just the right spot for a few days—or even a week—of stitching with old and new friends. You will get to learn a new skill or two, someone else cooks and cleans for you, and you get to meet like-minded stitchers. The Kings Mill Resort location is beautiful, and the class selection is varied, taught by world-renowned teachers. We just found out that there are a few spots open in both of our classes, Botanical Beauties and Lovely Vase. Though the classes are separate, the two projects can be combined to make our quilt, Lovely Botanicals. We just found out that the quilt has come back from being quilted by Bellwether Dry Goods, and we are so excited to see how it turned out. We promise to post pictures!

Botanical Beauties

Lovely Vase

Lovely Botanicals

While we would love for you to take our classes, there are many other wonderful classes still available. All you have to do is go to website, Academy of Appliqué and take a look.

It's not too late to put "a trip to the Academy of Appliqué" on your Christmas list. Who needs more underwear when you could stitch for a week! Or maybe you just want to treat yourself after a long year—you deserve it, don't you? No matter the reason you go, we think you will have an absolutely wonderful time, and we would love to see you there!


Thursday, March 16, 2017

Williamsburg's 2017 Academy of Appliqué: A Photo Journal

This functional colonial doll, with her sewing apron,  was as ready as we all were to spend a week with our stitching friends, enjoying the art of appliqué. This lovely lady was found in one of the gift shops in Colonial Williamsburg.
Aren't those hand-dyed ribbons behind her just screaming to be turned in to flowers?!

Kara and I (Teri) spent the day on Monday setting up our classroom in the Resort Center at Kingsmill Resort. Our first class was the Floral Wreath, above left, and the second class was the center block of The Secret Garden quilt, above right.

Our display tables were filled with samples of our appliqué work and a few wares:
threads by The Gentle Art, French wired ribbons, Hanah hand-dyed, silk bias ribbon for pansies,
an assortment of silk ribbons by River Silks, needles, pens, and our patterns and kits.

Fairy tale stitching on display, above left. Our Fairy Tale Album will be in the
Chicago Quilt Festival,  so a notebook of block photos had to take its place.

All ready! Kits, schedule, and goody bags—with chocolate, of course!—are all in place.
(Many thanks to Kristy for helping us set up our classroom!)

When we returned to our room, we were greeted by this welcoming committee,
who just looked at us calmly when we got out of the car to go inside.

We awoke to this spectacular view of the sunrise from our balcony!
The birds were singing, and we were ready for a great day.

On our walk to the Resort Center, we spotted this rainbow;
how could this day be anything but perfect?
(In fact, our whole week was perfect!!)

Such a focused group of stitchers! We started back-basting leaves, before moving on to wired-ribbon boat leaves.
Don't let the serious stares fool you: we had plenty of laughter interspersed with those quiet stitching moments.

Ann is appliquéing her rose leaves.

Gayle, Rosa, and Nancy are busy creating pansies with bias silk ribbon.

Joanne and Ann are gathering wired-ribbon roses.

Joanne's rose and pansy

Janet and Phyliss are stitching clematis petals.

Progress! Phyliss did a lot of "homework" the previous night;
look at all those blooms!

Mila is stitching a jasmine bloom next to her rose.

Rosa is working on the turkey work center of her clematis. 


The first day of the Secret Garden class required lots of appliqué to build the garden wall,
in preparation for "planting" our wisteria trees.

Everyone was excited to start the wisteria, which is made with twisted sari silk, appliquéd to the wall.

Susan, Heather, Sandy, and Kate look on as Kara demonstrates rolling a wired-ribbon rose.
And I can assure you that this class also knew how to have fun; this deep concentration had the propensity to turn to raucous  laughter at the drop of a pin. At times I wondered if the staff would peek in to see how stitching could be so funny.

Our collective bouquet of roses, with a few buds

Breakfast and lunch were served daily, included with our registration.
Each day, one or two teachers would give a short presentation, sharing a few pieces of their work. Pictured above is Rita Verroca, who spoke the last day—the only day I was settled enough to remember to take some photos! After lunch, I took a little tour into the other classrooms and took a few photos.

Kerry Burke, of Simple Bird Studio, teaches prepared-edge appliqué. To read about her Academy experience, click here.

Barbara Carper, from Williamsburg, taught the stunning urn of flowers, far left.


I decided to make one last stop in the Huzzah Quilt Shoppe, owned by Barbara Blanton,
who is also the proprietor of the Academy of Appliqué.
She had some amazing fabrics available that just flew off the bolts!

Barbara Blanton and a friend packing up the shop.
Those big smiles reflect the fabulous week we had all had!

Kathy Richardson of the Suffolk Shaker Shop with her amazing wood items, ...

... including Shaker baskets... 
...and a lovely assortment of stitching tools.


Rita's class chose one of two blocks to stitch, and they worked hard until the very end! 


Judy Severson's class is busy working on their broderie perse projects.
Such creative designing goes on in this room!

Alas! Sunday arrived and it was time to go home. We did get to sleep in a bit, so the sun was up and shining brightly as we left the room and packed the van. We had one more stop to make before heading back to Maryland.

We enjoyed a brisk walk through Colonial Williamsburg, enjoying the sights of yesteryear, ...

... as well as a few sights of spring!

Since my head was more in teaching this year than taking pictures, I didn't even get around to the other rooms during the first half of the week. Therefore, I've only given you a glimpse of half the week. Wonderful classes were also taught by Andi Perejda, Nancy Chong, Marylou McDonald, and Barbara Burnham. (I'm so sorry I missed their rooms!) 

If you have ever attended the Academy of Appliqué, then you know how special the week is: an opportunity to meet new friends and reconnect with old ones. (Rather, long-time friends—many of them are quite young!😊) As Barbara reminded us each day: "There are no strangers; only friends we have not met yet." And what a wonderful place to find friends who share the same passion! If you have never attended, consider putting this on your bucket list. You will not regret it. Hope to see you next year! 

Check it out! It's never too soon to start planning for next year.